Adventure Nomad

Adventure Nomad

Friday, February 23, 2007

Sigma 50-150mm f2.8


I really like this lens. It fulfils a very useful role on my 1.6 crop Canon 350D and replaces the 70-200mm range on my full-frame film camera. Having a lens with this range completes my change to the APS-C format. I no longer wish to have a camera with a full frame sensor. Lenses designed for the APS-C sensors like the EF-S lenses for Canon, or DX for Nikon can be designed to be lighter, more compact, and yet retain the same high quality as their full frame counterparts.

I walked into a camera shop to check out the lens, see how it felt and if it would fit into my bags and cases. I was most impressed with the feel and build of this lens and was ready to slap down some cold hard cash for this baby… until I tested it out.

There seemed to be some concern about front focusing from my research on the net. I tested out this lens at 150mm at f2.8 from a distance of about 1 to 1.2m away and, with the center AF point active, focused on the ‘8’. As you can see below, there definitely is some front focusing.


The shop basically advised me to wait for the next batch of lenses when, hopefully, Sigma will have fixed this. With PMA 2007 just a couple of weeks away, I’ll wait. I’m hopeful that Canon will announce its own version of this lens, have IS, and weigh 200g less... someday.

Photos:
Top: A crop of the bottom picture
Bottom: Straight JPEG from my camera of the box slanted at roughly 45 degrees, taken with the Sigma 50-150mm at 150mm, f2.8 from a distance of 1-1.2m away, center AF point active aimed at the figure '8'.

Monday, February 12, 2007

Optimize Your Camera's Settings


When I saw the first images that came out of my Canon 350D, I was disappointed. Pictures came out of the camera with cool, bluish tones and harsh, blown-out highlights. I had made a fundamental mistake. I had left the camera on Canon’s default ‘parameter 1’ thinking that Canon would know what I wanted. It doesn’t quite work that way. Only you can determine how you like your shots to look. A studio portrait photographer would probably set up his camera very differently from the way I set up mine.

Set up your camera by performing some camera tests, and make adjustments to the various settings to optimize the image straight out of the camera. In the days of film, you would shoot a test roll of your favorite slide film, bracketing exposures in 1/3 stops under a variety of lighting conditions to fine to the exposure meter. Like many outdoor photographers, I preferred the look of a 1/3 stop underexposure to produce richer colors and preserve highlight detail. Tweaking the settings on a DSLR is even more important, because you are, in essence, creating your own digital ‘film’. In addition to fine-tuning the exposure meter, some of the settings you can tweak include contrast, white balance, saturation and the flash exposure compensation.

Ideally, you should test your camera under a variety of lighting conditions. But that’s just too much work for me. Typically for me, the most demanding type of shot is a high contrast scene that includes some sky, and a partially shaded subject in direct sun. Here are some of the settings on my Canon XT 350D, but the principles can be applied to any camera:

Exposure
With the exposure meter set to Evaluative (Matrix, for Nikon users) mode, my 350D tends to open up shadows and wash out the highlights. I generally set the camera for –0.7EV. It gives me more latitude and forgiveness for keeping details in the highlights under high contrast conditions.

Contrast
I set mine at –2. –1 looks all right too, but I wouldn’t set it higher than 0. Canon has settings that it calls “Parameter 1” which boosts the contrast to +1. Big mistake. It’s supposed to give the image more ‘punch’, but at the expense of washed out highlights loss of shadow detail. At lower contrast settings, the camera manages to hold onto some detail that would otherwise have been lost. If the image needs it, I prefer to boost contrast back in post processing.


Saturation
I set mine at +2 for rich, vibrant colors. If you are shooting people, watch out that you don’t overdo the saturation setting. Increasing saturation also has an effect on increased contrast. So watch out that you don’t overdo the contrast setting as well.

White Balance
I leave it in Auto White Balance, because if I set it on something else, like Cloudy, I’m likely to forget and screw up my nighttime shots. However, Auto is a bit too cool for me under most conditions, especially under shade, so I tweak the Auto setting by shifting it Amber +5 (a 25 Mired shift). Under full shade, even this setting is not warm enough for me. I’m still trying stuff out and I might try a +6 Amber shift or play around with shifting the Magenta axis as well. Update 4 Mar: Auto White balance under incandescent lighting is really poor. The technique to use Auto WB will work under most outdoor situations, but indoors, under incandescent lighting, I would change WB from Auto to Incandescent. It's probably best to run some test shots yourself before you offer to shoot your best friend's wedding!

Flash Exposure Compensation
One of my biggest frustrations with Canon is the unpredictable flash performance coupled with the low sync speed of 1/200 sec. To understand more on how the Canon flash works, read this excellent FAQ on EOS Flash Photography. First of all, in P mode with flash, you can’t shift the shutter speed or aperture. The camera decides for you and that’s that. Secondly, in P mode, the camera decides if the flash is going to be used for fill light or as the main light source, and will expose accordingly. For example, if it is bright out, the camera decides that you want fill light, exposes for the ambient light, and automatically reduces the flash output for fill. But if it is dark, the camera decides that the flash is going to be the main lighting, disregards ambient lighting and meters only based on the output of the flash.

Fortunately, in Aperture and Shutter Priority modes, the camera always exposes for ambient light and the flash is just for fill light. I prefer to set Shutter Priority mode to ensure I don’t exceed the sync speed, as well as to ensure that the meter correctly exposes for ambient lighting, and dial in –1.7EV of flash exposure compensation for fill light in scenics and -1EV for people shots. If I have to use P mode, I set the flash compensation to –1EV and hope for the best.

I set my flash to sync with the rear curtain. Default is for front curtain sync, but that just looks odd to me, particularly at slower sync speeds. I think most people would be better served by setting their flash to rear curtain sync.

I shoot JPEG using Canon’s ‘Creative Modes’ (Av, Tv or P). If you are shooting RAW or using the scene modes, you won’t need any of this stuff except perhaps fine-tuning your exposure meter. Each setting change makes a very small difference to the image. The idea here is that Canon’s settings aren’t engraved in stone, don’t be afraid to experiment, to play around with different settings and to just have fun.

Photos
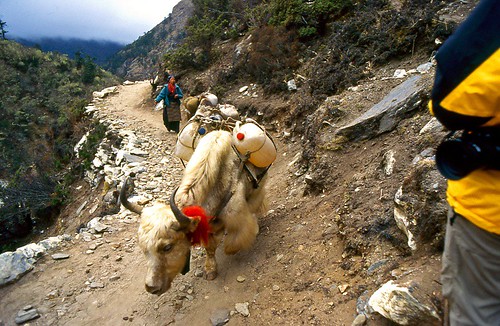
Top: Kodak E100VS at 1/3 stop underexposed for richer colours and preserve the highlights, shot on a Nikon FM2, 24mm.
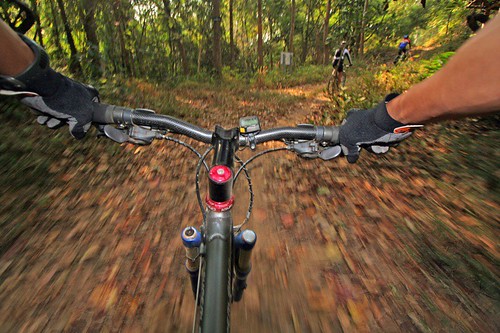
Middle: Mountain Biker's Voodoo Doll shot with all the settings I described. Shot on Canon 350D, Exposed at -0.7EV, Contrast at -2, Saturation at +2, auto White Balance with +5 Amber trim.
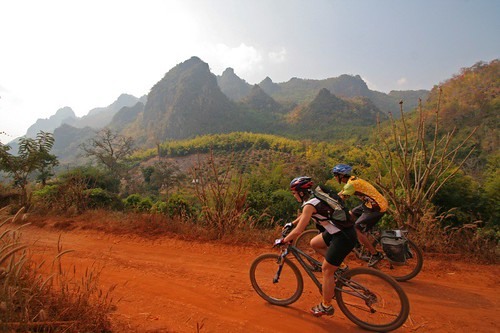
Bottom: Mountain biking shot with camera on body, fill flash set to -1.7 FEC to bring a little detail to my shadowed arms, exposed at -0.7EV, Auto White Balance with +5 Amber trim, Contrast -2, Saturation +2.

Thursday, February 1, 2007

The Best Camera for Adventure Sports


For a short time in the 90’s, I owned a Nikon F4. It was a top of the line pro body that produced excellent images, but was a beast to carry. It was fairly new when I took it (big mistake, but that’s another story) trekking with me to Nepal to cover an assignment for a magazine. Early on in the trek, I carried all my gear. Then I engaged a porter to help me out. He carried most of my gear while I carried only a small daypack with daily necessities like a jacket, money, and all my photographic equipment. Then I gave him my tripod. Then he took my 300mm f4. Eventually I was left carrying just the F4 body and a few small lenses, and even that was a burden. Soon after that trip, I sold off my f4. The F4 may be the best camera for someone else, but it just wasn’t for me.

So what’s the best camera? There isn’t one. As a participant in adventure sports, it’s going to be the camera you are willing to take with you. Only you can decide for yourself the balance of getting images versus how much that camera is going to impose on your participation. I can suggest some guidelines, and those are: weight, image quality and replacement cost.

Weight
Light = Fast, and weight is often going to be the overriding factor. When I ran a 7-day ultra-marathon in the Gobi Desert in 2005, I carried a small point and shoot - a Pentax Optio 43WR, in a Lowepro pouch attached to the shoulder strap of my backpack. It was light, water-resistant, offered adequate image quality and hardly imposed on my participation of the race.

Image Quality
When having the flexibility of an SLR is more important to me, it’s the Canon Rebel XT 350D or XTi 400D. Like all electronic equipment, they are fragile and highly hydrophobic. I carry mine in a chest pouch for rapid access with a couple of zip-lock bags in the pocket (see my post Replacement ‘Galen Rowell’ Chest Pouch in January).

For a typical wilderness trip of 5 days, I take about 1000 shots. The Canon 350D will need 2 batteries, and paired with my main working lens, the Canon 10-22mm, it has a total weight of 954g (485+385+42+42g). By comparison, the Nikon D200 + 12-24mm DX weighs 1475g (830+485+80+80g) but offers weatherproofing and a better build. A Canon 5D + 17-40mm L offers the best image quality for the maximum amount of weight I can conceive of carrying, and that’s before adding the weight of a flash unit as it doesn’t have a pop up flash. Don’t get me wrong, I’d love to have a Nikon D200 or Canon 5D and, if my priorities change, I’ll be shooting with one of those. They are beautifully built tools. Enough said.


Since adventure photography is mainly about shooting people having fun, I carry the same lenses a photojournalist would use: A Canon 10-22mm lens (16-35mm Full Frame Equivalent) and a medium telephoto zoom like the Sigma 50-150mm. Prime lenses just don’t offer the flexibility of being able to zoom in quickly when you need to work fast.

Replacement Cost
This is basically the price of the camera and how much it is going to cost you to get it replaced if you smash/submerge/drop/lose or otherwise damage it. It is the risk of loss or damage to your camera that is going to make you think twice about bringing your expensive machine into a hostile environment.

I have no hesitation about tying my Canon 350D to my body with a bungie cord and quickly activating the self-timer on easier terrain to get shots like the one on the top of the page. My mobility on the bike is a little bit compromised and when I eventually pushed it too far, I crashed and went over the handlebars. I’m not too sure I would do it with a Canon 5D which costs 4 times as much.

One tip to bringing back great images is to shoot early in the day. Not only is the light better, but you probably still have the mental capacity to be on the lookout for photo opportunities. You will need to visualize the shot you want to take, quickly move ahead into position and get the camera ready. If you blow the shot, it’s unlikely that your teammates will return for another shot. In a non-competitive environment, you can ask your buddies to slow down until you are ready, or re-do the section. Finally, whatever camera you choose, make sure you have ready access to it. It’s no good to you if it’s buried deep in your pack. Good luck!

Photos:
Top: Get Out Of The Way! A yak train moving supplies up the Khumbu. Taken with a Nikon F4, 24mm lens.
2nd: Going Fast with a Canon 350D bungied to my body, 10-22mm lens, pop up fill flash
3rd: Racing The Planet with my teammates at The Gobi March 2005, Pentax Optio 43WR
Bottom: Crash with my Canon 350D still bungied to my body, photographed by my wife, Laura, with a Pentax Optio 43WR.

Mountain Biking Northern Thailand


I just got back from my second mountain biking trip to Chiang Mai, Northern Thailand. It’s nicknamed the mountain bike capital of asia and it’s easy to see why. The variety of riding, combined with the friendly Thai culture, great food, great shopping and relatively low prices, make it a wonderful holiday getaway.

There’s a lot of scope for cross-country mtb with numerous doubletrack and singletrack trails that criss-cross farmland. For less technical riding, there is also a lot of primitive and dirt roads that you can ride, just let your guide know what it is you like. Unfortunately, there isn’t a whole lot of published information about trail locations or maps. Local knowledge is a must. Either go with somebody who knows the trails, or upload GPS coordinates from somebody who has been there before. If you need a guide, I highly recommend King Saksipong. If you’d like to hire him, let him know well in advance. He’s already been booked by 117 riders for November this year. king_saksipong@hotmail.com

Chiang Mai is the second largest largest city in Thailand, but it feels less touristy than the beach resort of Phuket. Two places for shopping are the night bazaar on Loi Kroh Road, which is open nightly and is heavily patronized by tourists; and the ‘Pae Walking Street’ (Ratchadamnoen Road) in the old city, which is only open on Sunday night and frequented by the locals.

Thai massage is something of an art form. Getting a good one is an experience not to be missed. The Loi Kroh Massage School http://www.nuad-chiangmai.com on Loi Kroh Road gives the best Thai massage I’ve had, and at a reasonable price. It’s a treat and a great way to end your ride.

Photos:
Top: The Hills of Chiang Dao, near Chiang Mai, Northern Thailand
Right: Night shopping at the Pae Walking Street, Ratchadamnoen Road

More photos from this trip here