Adventure Nomad

Adventure Nomad

Monday, June 30, 2008

Nikon D700: Get Excited. It's real!

Nikon D700 image from www.nikond700.com

The FX Format (Full Frame) Nikon D700 was announced today together with the new SB900 speedlight. The specs are available on Ken Rockwell's site.

Ooh...

Sunday, June 29, 2008

The Mongolia Sunrise To Sunset Marathon

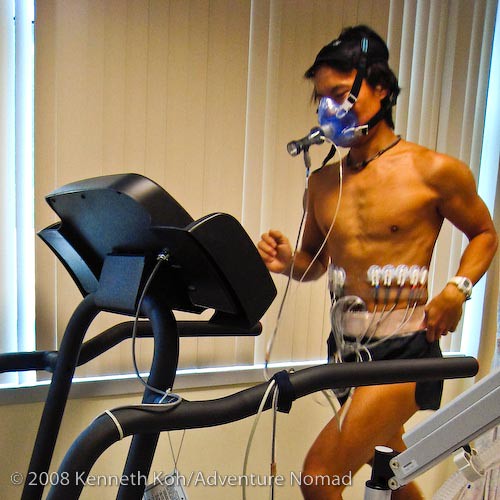
Treadmill VO2 Max test

The Mongolia Sunrise to Sunset is primarily a 100km ultramarathon, which takes place around the Hovsgol Lake region of northern Mongolia. Unfortunately, I not really in shape to do a ‘hundred K’ race, so I wimped out and am only participating in the 42km event.

I’ll be gone from 1st July to 14th July. I’m hoping to see some of the Naadam Festival that is going to take place about the same time while I’m there. I’ll be bringing my Nikon D300, and my usual travel lenses: the 18-200mm superzoom and 10.5mm fisheye. I’ll also be bringing the big gun, and old (but seldom used) 80-400mm. I hope to have some new pictures to share with you then.

Friday, June 27, 2008

Nikon D700: The Next Full Frame Nikon?

A leaked(?) image from a (supposed) Nikon D700 brochure

Is the D300 the last of the DX sized (1.5 crop FOV) sensor cameras? Unlikely. But it is highly probable that Nikon will launch an FX sized (Full Frame) sensor camera in a D300 sized body for the serious amateur or pro who needs a lighter weight body.

Rumors are flying around that this will be the D700, a camera using the highly successful Full-Frame FX sensor from the D3. It will complete directly with Canon’s aging 5D (or the 5D replacement).

I’m not sure if I want one… yet. For now (after some initial hiccups), the D300 is serving me well as the near perfect travel, expedition and adventure camera.

However, the advantages of low noise, high image quality from the larger, full-frame sensors cannot be ignored, and as the costs of buying one of these cameras continue to fall, the question is not IF I will buy one, but WHEN I will buy one. I suspect that within the next 15-20 years, we will all be using full-frame cameras.

The Supplement Warehouse

If you live in Singapore, and you are a bodybuilder, mountain biker, or triathlete, you should check out what these guys have to offer. They’ve been selling quality nutritional supplements for a lot less than the big boys in town.

Since quitting my job, I’ve had to go low tech on sports nutritional supplements: soymilk for a post workout drink and a sugared lime drink for workout fuel; and I have noticed a drop in my performance.

Yesterday, I added The Supplement Warehouse in Singapore as a sponsor, and I’ll be bringing 4 of their products with me when I participate in the Mongolia Sunrise to Sunset Marathon on July 9th.

Champion Nutrition’s Muscle Nitro;
Champion Nutrition Revenge Sports Drink;
Carb Boom! Gels; And
Universal Nutrition’s Torrent Post Workout Drink;

I hope to be able to review these when I have more experience with them.

Tuesday, June 24, 2008

Adventure Singapore: Running the Southern Ridges

Running the Henderson Waves Bridge

What is it?
The Southern Ridges are a collection of park connectors, elevated walkways and bridges that link up West Coast Park to Harbourfront. It is a distance of 9km (one way) if you do the entire trail. The total cost for the construction of the elevated walkways and bridges was SGD$25.5 million.

Click map to view large

Trail Guide

Ok… so it’s not a dirt trail and it is paved the entire way, but it still is pretty fun, and a change from the usual trail runs in Singapore. You can start at either end. If you are taking the MRT, Harbourfront is the station to get off. Make your way to Mt. Faber via the Marang trail and follow my trail guide in reverse. I normally start from the parking lot at Kent Ridge Park, run to Mt. Faber and return. It’s the most scenic part of the Southern Ridges and is about 11-12km for the return trip.

The Canopy Walk

From Kent Ridge Park, head east and take the Canopy Walk. This is a 300m long, wooden elevated walkway about 16m above the forest floor. When you reach the end, turn right and go down the stairs. Follow the signs and continue either via Hort Park or Hyderabad Road. I suggest going up one way and coming back another.

Approaching the Anderson Arch bridge

The Anderson Arch bridge is at the eastern end of Hort Park/Hyderabad Road. It links up to the 1.3km long elevated walkway called the “Forest Walk”. The height of the forest walk ranges from 3m to 18m above the secondary forest of Telok Blangah Hill.

The Forest Walk ends at Telok Blangah Hill Park. You can take the Hilltop Walk (I haven’t tried it), but most people follow the road and the signs leading to the Henderson Waves bridge.

The Forest Walk

The Henderson Waves bridge is 36m or 12 storeys above the road, making it the highest pedestrian bridge in Singapore. It links Telok Blangah Hill to Mt. Faber.

Once you get to Mt. Faber, several options exist. You can complete the Southern Ridges by running the Marang Trail to Harbourfront, or run to the summit, or run the Mt. Faber Loop Road which takes you back to the Henderson Waves bridge for the return.

Bring water. I run the trail with 1.5 liters of water. You can buy drinks at McDonald’s near West Coast Park, or at the cafés in Hort Park and Mt. Faber if you get desperate.

Photos: All photos taken with a Sea & Sea 1G/Ricoh GX100

Saturday, June 21, 2008

Nikon D300 and Lightroom

My obsession over the past couple of weeks has been trying to get my D300’s Matrix Meter to behave. I said in my last post that I neglected to set the brightness to -1 on my camera when using Nikon’s D2xModes. Unfortunately, this has no effect when I use Adobe Lightroom to process my RAW NEFs. Zip. Nada. This is because adjusting Nikon D300 Picture Control settings has no effect on NEF files imported into Lightroom.

For the moment, I’ve settled on parking the exposure compensation at -1/3 EV for outdoor shots for when I don’t have time to tweak the exposure settings. This seems to be a good compromise between protecting the highlights and the shadows. Tastes vary, and you should know that I prefer the look of blocked shadows over clipped highlights and so I don't mind accepting a slight underexposure at capture.

The default settings Lightroom uses when opening up an image aren’t necessarily the best to use with the D300. They can make images appear overly bright. If you like them, that’s fine, but I also recommend you have a look at Michael Kirk’s MLK Preset. His preset is designed to make images from the D300 appear similar to those from the D200, which for me is a better starting point. I found the preset here in the Adobe Lightroom Forum, and unfortunately, you need to be a member to access it. Fortunately, membership is free.

Tuesday, June 17, 2008

Oops…

Oops…

After bashing my Nikon D300’s Matrix Meter last month, I’m embarrassed to say that when I uploaded Nikon’s D2XModes into my Picture Controls, I neglected to read the fine print, which recommended setting the brightness to -1.

Duh!

Monday, June 9, 2008

Apple Iphone 3G Launch

Photo of the Apple iPhone 3G from the Apple website

The Apple iPhone 2, officially known as the Apple iPhone 3G, was announced today, June 9th. On July 11th, it will officially launch in 22 countries, including Singapore.

Other than the über cool factor, has it any practical use for an adventure traveler? I wasn’t convinced until I saw the original iPhone in use last month, at a free wireless hotspot in Pokhara, Nepal. The proliferation of wireless hotspots around the world, even in relatively poor countries, makes this phone appealing. While I’m not always willing to lug around my laptop when I travel to remote locations on the off chance that I will be able to find a wireless hotspot, I almost always have my phone with me.

What’s new over the old iPhone? Well, the big new is that the iPhone 3G is no longer locked, so you’ll be able to buy the iPhone and use it like a regular phone. And you'll be able to buy it for a lot less than the old iPhone!

It's slightly thinner than the old iPhone, but packs in more capability for roughly the same weight. Other than Wi-Fi connectivity, the new iPhone can also connect you to the Internet using a mobile service provider’s faster 3G connection (where available). iPhone 3G also comes with built-in GPS, and an accelerometer (play games that sense movement similar to the Nintendo Wii).

It’s available in 8GB or 16GB versions, and it comes in black or white.

Woohoo!

Friday, June 6, 2008

Good Enough

Dizzying. Canon XT/350D, Canon 10-22mm at 10mm, 1/6 f/4.5, ISO 1600, flash.

If you are on a tight budget (and I mean rock-bottom TIGHT), and want a DSLR for travel and adventure, I have a suggestion for you: The Nikon D40 or Canon Rebel XT 350D paired with a Sigma 18-200mm F3.5-6.3 DC lens. These can be found on the used market and won’t set you back much more than a point-and-shoot.

Both camera bodies are quite similar with regard to cost, weight, battery life and build quality. However, the Canon XT/350D is an 8MP camera, and the Nikon D40 only 6MP. The XT/350D also has 7 Autofocus Points and the D40 just 3. I have the Canon XT/350D, but if I were buying for this to use with this particular lens, I have a slight preference for the Nikon D40 over the Canon XT/350D. Here’s why:

Crop Factor
There’s a slight difference in the focal lengths you get with the Sigma 18-200mm on different bodies. The Canon XT/350D uses a 1.6 crop factor, which means the lens will give you an equivalent FOV of 29-320mm. The Nikon D40 uses a 1.5 crop factor, and so you’ll get equivalent FOV of 27-300mm. I prefer to have the slightly wider field of view with the Nikon.

Nikon D300 with Nikkor 18-200mm VR (left) with the smaller and lighter Canon XT/350D and Sigma 18-200mm (Right).

Image Noise
For your money, you get the lightest 18-200mm lens currently available (405g). What you don’t get is Image Stabilization or Vibration Reduction*, which means you’ll need to crank up the shutter speed and/or ISO to get a sharp image. A camera that produces cleaner images (less noise) at higher ISOs has an advantage with this lens, and the Nikon D40 has cleaner images than the Canon XT/350D (Source: http://www.dpreview.com/reviews/nikond40/page17.asp).

Auto-ISO
When you are ready to move out of the green fully Automatic shooting mode, this will come in handy. The Nikon D40 has it, and the Canon XT/350D doesn’t. It’s not really a hassle to change the ISO for the lighting conditions, but you’ve got to remember to do it. For some adventure travelers, having the camera set the ISO automatically is a boon. For example, say you’re in Tibet exploring a monastery and you duck into a dark temple. It’s easy to remember to change up the ISO, because you’ll know you’ve forgotten when your first shot inside has an unusually long shutter speed. But when you walk back out into bright daylight, it’s easy to forget to change it back. Higher shutter speeds sound normal, and don’t clue you in to change down the ISO, which means by the time you realize your error, you’ve unnecessarily shot a bunch of grainy, high ISO shots in bright daylight.

* Sigma makes an image stabilized version of this lens, the 18-200mm f3.5-6.3 DC OS. It weighs 610g, and costs quite a bit more.

Sunday, June 1, 2008

Nikon 10.5mm: The Sidekick

Trekking the Annapurna Circuit. Nikon D300, 10.5mm, 1/400 f/20, ISO 200.

The Nikon 18-200mm lens covers such a broad range of focal lengths that others have called it a do-it-all lens. Well, it almost is, and for those situations where I find the 18-200mm lacking, and I don't mind carrying a little more weight, I carry a small, lightweight sidekick lens. When I went trekking to Nepal last month, the sidekick I chose to bring along was the Nikon 10.5mm f/2.8 Fisheyefor ultra-wide fisheye shots.

Crossing Thorung La. Nikon D300, 10.5mm, 1/800 f/14, ISO 200.

The 10.5mm is a frame filling fisheye, stretching a 180-degree view diagonally across the frame. It does NOT produce a circular image. That wouldn’t be very useful in the field.

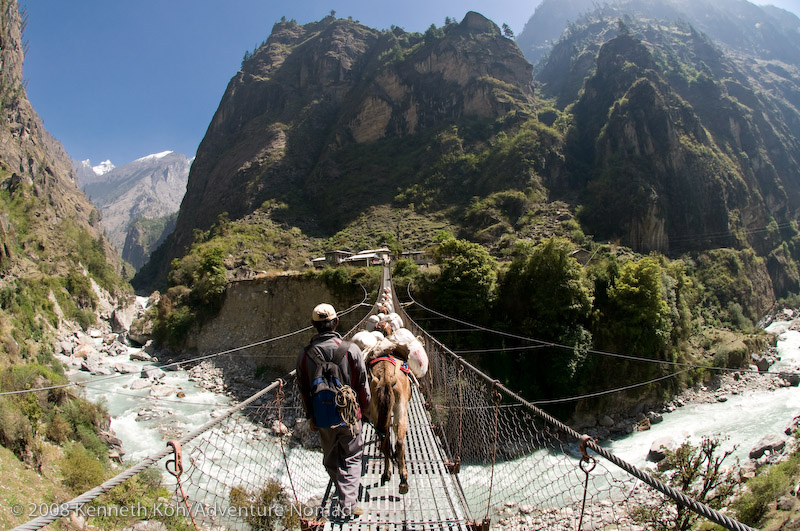
Donkey train crossing a bridge. Nikon D300, 10.5mm, 1/320, f/9, ISO 200.

I like to think of the 10.5mm as an ultra ‘ULTRA’ wide-angle lens. The center of the frame is low on distortion and a great place to put people in the shot. The distortions are greatest at the corners of the frame. Outdoors, where there are no straight lines, the fisheye distortion can be used for dramatic effect.

Once upon a time in Pokhara. Nikon D300, 10.5mm, 1/125, f/13, ISO 200.

If you’re not into the fisheye look, another lightweight and useful sidekick example might be a Nikon 50mm f/1.4. Its large, light-gathering aperture would be useful in low light or for blurring distracting backgrounds in portraits.