Being able to bring back breathtaking images from a lightweight adventure trip, such as a thru-hike, are really part of the purpose of the trip for me. But when the need to go ultra-lightweight conflict with the need to bring a camera, some decisions need to be made to keep the weight down, and the quality up. Here’s the gear I used for my PCT thru-hike, my thoughts and process:
The Gear
For ultralight adventures, I have a preference for compact cameras with 1″ sensors, like those made by Canon, Panasonic and Sony. I carried one of those to the summit of Everest, and are what I chose for my PCT thru-hike. For me, they are the lightest weight, rugged enough, high quality option for a trip where minimum weight is a priority.

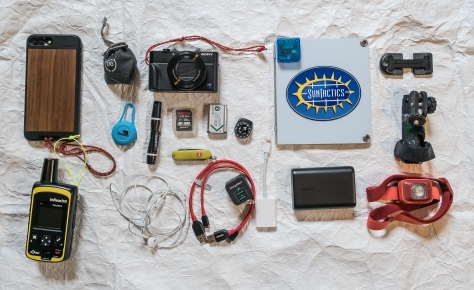
For my thru-hike, I used a Sony RX100 Mark IV and Mark V. I damaged the monitor on my Mark IV in the desert, and my wife brought me a new Mark V to Kennedy Meadows, which I used (more carefully) til the end of the trip. The Mark III, IV and V have similar focal length zoom rang: 24-70mm, so if you are trying to save some money, going down the evolution tree might suit you. The 24-70mm zoom range is great for ‘people’ shots, but if I were to thru-hike the PCT again though, I would take the newest Sony RX100 Mark VI, which has a 24-200mm zoom range. The additional telephoto range is useful for wildlife, but sacrifices a bit of aperture to do it, so it isn’t as good in low light, and will have a bit more image noise overall. Also, it costs more than the other cameras.

I also used my iPhone 7 plus with the Moment Superfish lens* to complement my Sony RX100 for a wider (fisheye) focal length perspective. Why not use my iPhone for all my shots? For me, the main deal breaker is that it doesn’t do so well in low light. They are also cumbersome to operate, especially if you want manual settings. My iPhone camera makes a good supplement to my compact camera for options, like a Fisheye, ultra-wide or Macro lenses, but as a main camera, they are not quite there yet for me.
*Note: Use of Moment Lenses requires the Moment Case.

I used a lightweight Pedco Ultrapod mini-tripod, which I left attached to the camera most of the time, mainly for selfies, like those you see in these shots and in the video below. You have to be creative with setting it up: You can set it up on the ground, on a rock, strapped to your trekking pole, tree branch or post. The whole setup fits in a ZPacks Shoulder Pouch attached to the shoulder strap of my backpack for quick access. For selfies, I used the 10 second self-timer on the camera to allow me enough time to get into position, then fired off a burst of 3 or 5 shots. There is also an option on the RX100 to use your smartphone as a remote, which I used once for a night shot.
For my iPhone, I had a Joby Griptight One, which I bought together with the Micro Stand. That could be a great option if you just wanted to use your phone camera for the thru-hike. I took the stand off and just used the Griptight part to attach my phone to the Ultrapod. I have the ProCamera App on my iPhone, to shoot RAW and for the extended self-timer. I also carried a bluetooth remote shutter release for the iphone which I used only once.
In The Field
I tend to do most of my photography in the early morning. The light is great, I feel fresh, and I have the whole day ahead of me with no pressure to reach a campsite for the night.
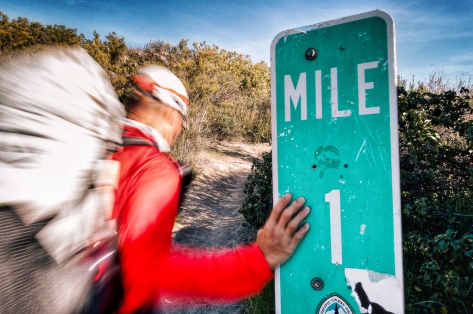
I shoot mostly in Aperture Priority Mode. I’ll choose something like f/1.8 for shallower depth of field or perhaps f/11 to create a sunstar if I’m shooting into the sun. Occasionally, I’ll shoot in Shutter Priority Mode to create some motion blur, as in the photo above. Shooting in one of these semi-automatic modes frees me to make one creative decision, either the aperture or shutter speed, while letting the camera work out the the rest, like the ISO. I will put the camera in Program Mode if my brain is fully occupied with other tasks or I need to focus, like when climbing Everest and low on oxygen. I rarely shoot fully Manual, but will do it if it’s something the camera cannot handle, like night shots.
My Sony RX100 camera charges directly with a USB cable, so in the evening, it’s a simple matter to just plug in my camera into the power bank for charging. I had a Suntactics S5 Solar Charger, and found it very useful in the desert and the Sierras, but not for NorCal, Oregon and Washington, where I replaced the solar charger with a Qualcomm quick charger for quick town stops.
Post-Process
When I have a zero (rest) day, I’ll transfer selected images from my camera to my phone for editing, posting to social media and for backup to the cloud. I used to carry an Apple SD Card to Lightning Adapter, which would allow me to transfer the RAW images, but found that too much of a hassle, so I just used the built-in Sony App to wirelessly transfer a small JPG file from my camera to the phone. These were good enough for Instagram, but not for viewing on a large monitor or for printing. However, If you shoot JPG, the camera will transfer a large JPG file to the phone. I used Adobe Lightroom CC (paid) and Snapseed (free) on my phone to edit and post the images. Not everyone likes my editing style, but if you are interested to replicate the look, here’s a quick and easy Snapseed editing tutorial on how I do it. The images you see in the video linked below have all been reworked from the original RAW files for viewing on large monitors.
This seems a lot of effort, and it is, but I love sharing the experiences I’ve had with others, and having powerful images that make an impact are worth it me.

