Adventure Nomad

Adventure Nomad

Sunday, July 31, 2016

How to Edit a Photo on Snapseed in 5 Easy Steps

Snapseed is a powerful, easy-to-use, photo editing app that's available on both IOS and Android.  Best of all, it's FREE!  Here are 5 easy steps that could benefit just about any photo, that you can easily accomplish in Snapseed in 5 minutes or less.


Below is the original image of me on a slackline captured on an iPhone 6 Plus by my wife, Laura.  It's a great shot!  Laura captured the moment perfectly, but the image could use a little help from Snapseed to really make it 'pop'!  Above is the final image after editing in Snapseed and uploading to Instagram.  Wow!  It only took me about 2-3 minutes, and in only 5 easy steps!  Here's how I did it:


Step 1: Straighten and Crop Tools
Straighten the image using the Rotate tool if required, and then crop.  For this image, I cropped in tighter, removing excess 'clutter', kept the sun in the image, and had the end of the slackline run out to the bottom right edge of the frame.


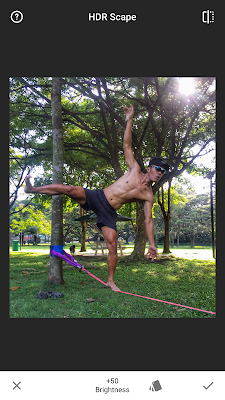
Step 2: HDR Scape Filter
This is a powerful tool to adjust exposure.  You could adjust the exposure with more control using a number of different controls, but with just one step, this filter will brighten the shadows and bring back some detail into washed out highlights.  You can also brighten or darken the overall image.  Of the 4 settings: Nature, People, Fine and Strong; I tend to use Nature unless there are people in the shot.  But I'll run through Nature and People to see which one works better.  Most photos can benefit from a little use of this filter, but be careful not to use overuse it, otherwise your image can come out looking too flat and fake.  In general, I don't exceed 50% with this or any setting.  I used +40% of the Nature setting here, with brightness set at +50%.


Step 3: Drama Filter
This is where the magic happens.  Like the previous filter, Drama accomplishes a lot in one step.  Drama adds local contrast, sharpness or 'pop' to an image.  There are a number of different filter settings at the bottom, and clicking each will give you a good idea of what it does, but the default setting is way too strong and the saturation too low, giving the image a 'gritty' feel.  You can adjust to suit your taste, but for me, less is usually more.  I generally use Drama 2, but dial the effect down somewhere between +10 - +50%, and then I raise the saturation up until it looks normal.  For this image, I set the filter strength at +25%, and the saturation at -15%.  Toggle the before/after selector on the top right to see how far you have taken the effect.


Step 4: Selective Tool
We are almost done.  Go over the image and have a closer look at the details.  Faces are one area that require special attention, and in most cases, could do with a tiny bit of brightening.  I used the Selective tool to make a little circle around my face, and then I brighten it just a little.  In this case, I used +10% brightness.


Step 5: Vignette Tool
In most cases, I add a vignette to isolate the subject.  Some images look better with it, some look better without it.  In this case, the bright areas to the right are distracting, and I used a vignette and moved it over the left center of the frame.  The default Outer Brightness of -50 was fine, but I raised the Inner Brightness to +10.  You could use some of the other filters, such as the Lens Blur to do it as well, but that look is a little harder to pull off.

The final image, as uploaded to Instagram, is on the top the page.  I use these same 5 steps in about 90% of the images I upload to the web.  Below is another before and after example I shot with my Sony RX100 of Laura at the National Mountain Bike Championship.  Check out my Instagram feed for more examples!


Friday, June 24, 2016

Shooting Bali Rides

Cool!  I was invited to Bali to ride and shoot a video for Nina FiztSimons and Ramang Kristian who own and operate Bali Rides.  I got to invite four of my friends down for this four-day gig, so I asked my wife, Laura, and long-time collaborator Aloysius Wee, President of the Kuala Lumpur Mountain Bike Hash Scott Roberts, and GoPro Distributor for Malaysia Khoo Boo Hian along for the ride.


As usual, the riding was superb.  We got to ride new singletrack, including a moderate downhill track, which was about the maximum I could handle with my XC bike.  The weather held up all four days, and the views were stunning!  If you get a chance to go to Bali, give these guys a call.

I took what I thought was a minimum of gear for the shoot, but I've learned that I can pare it down even further.  For my style of shooting, here's what I think I need:

Main Camera: 
Sony A7sii.  Full frame for shallow depth of field.  Shoots insane low light.  Useable video autofocus.

Lenses:
Zeiss 24-70mm f/4.  Relatively compact and lightweight.  A good general purpose lens.
Sony 10-18mm f/4.  Useable full-frame at about 16mm for ultrawide and timelapse shots.  Also restores wide to normal perspective at 100fps at which the a7sii crops in 2.2x.

GoPro:
Hero 4 Black.  For POV, drone shots, and anything that is going to get wet.
Essential mounts: Vented Helmet mount, Chesty, Jaws Clamp, tripod mount, Selfie stick.

Tripod:
I use a tiny Slik Sprint Mini with the center column removed and a Really Right Stuff compact ballhead bolted directly to the legs.

Drone:
DJI Phantom.  I'm still using the original Phantom with a cheap gimbal.  I've two minds about using a drone.  On the one hand, the drone is bulky, heavy and a pain to carry, set up and fly, but on the other hand, it gets shots like nothing else can.

Sound:
Rode VideoMicro on camera.  I used this for the interview with Scott and also for the temple shots, but I should really use it all the time instead of the built-in mic.  For really light weight adventures, I'm going to leave my wired lavalier mic and Zoom H1 recorder at home.

Slider:
Ratrig Mini 35.  Never used.  There just wasn't time to set it up.  All the sliding shots you see in the video are hand held and stabilized in post.  That proved to be good enough for me to leave the slider at home for light weight travel.

Thursday, May 26, 2016

Simply Awesome: The North Face Waterproof Lumbar

I've been looking for a way to carry my oversized iPhone 6+ for the times when I'm out and about, and keep it dry from sweat and sudden rain storms.  Here in humid, tropical Singapore, both are a real problem.  When I added the Sony RX100 pocket camera to my assortment of carry around items, I knew I had to find a solution.

Laura models The North Face Waterproof Lumbar - Medium
Enter the North Waterproof Lumbar Pack.  It is a 4 liter (244 cubic inch) capacity, roll-top lumbar pack with fully taped seams.  When I first saw this, I thought it looked gimmicky and could not be waterproof.  Well, I took it home and held it under water for 30 seconds, and it did not leak.  The pack also has three external pockets that aren't waterproof, that are useful for things like keys or snacks, but everything you need to keep dry has to go in the main compartment.


It has become my 'man-purse' of sorts.  All my electronics and valuables, like pocket camera, cell phone, wallet, iphone lenses, spare batteries and memory cards, sunglasses earphones, and lens cleaner go in the main compartment.  Keys (if your car key has an electronic remote, it needs to go into the mail compartment), lip balm, and other small items I don't need to keep dry, go in the outside pockets.  In daily use, I tend to just clip the two ends of the roll-top together like a regular dry bag.  It works to keep the bag waterproof, and is quicker to open and close, since I only make one clip, but does not look as neat as clipping the two ends and cinching it down the sides of the pack.

What is also cool is that you can separate the waterproof bag from the hip belt, and you could use that like a regular small dry bag.  It will hold more than the items shown above, but keep in mind that the capacity is only 4 liters.  On my scale, the whole thing weighs 249g, and the separated dry bag weighs 104g, so a pretty lightweight setup.

The roll-top dry bag can be separated from the hip belt
It keeps my valuables and electronics dry, and safely secured around my waist.  It's the best outdoor 'man purse' I've ever used... Period.  'Nuff said.

The North Face Waterproof Lumbar is currently available at The North Face Singapore Stores.  

Disclosure:  I am sponsored by The North Face Singapore.  As such, I get gear from The North Face at no cost to me, or at a discounted price.  The item reviewed above was requested for my own personal use.  I just like it so much, that I felt I had to share it with you.

Wednesday, May 4, 2016

Penny Board vs. Oxelo Yamba

I wanted a small skateboard for transport and a little bit of fun.  I'm new to skateboarding and didn't want to pay too much, in case I found that it wasn't for me.  I borrowed my niece's 2-year-old Penny Board, and after a while, decided that pink wasn't really my colour, so I bought an Oxelo Yamba from Decathlon, which is a Penny knockoff.

Top: Oxelo Yamba; Bottom: Penny 22"
From the outside, there didn't appear to be much difference.  They are both roughly the same length, 22", although the Yamba is a little shorter, as you can see in the image above.  The Penny weighs 1920g and the Yamba weighs slightly more at 1980g.

Orange Yamba Wheel left; Green Penny Wheel right
They both use the same ABEC 7 bearings, but the Penny cruised far longer than the Yamba.  When I spun up the wheels, the 2-year-old Penny bearings spun for longer.  Since my niece got a new Penny and didn't want the old one anymore, I took the old Penny bearings and installed them on the Yamba.  When I spin up the wheels, the transfered Penny bearings on the Yamba spin for longer, but strangely, when I ride the boards, they both now go about the same distance, so something else is going on that works in the Penny's favor, and I suspect it may be the wheels.  Read on...

Yamba Hardware, 20g
Penny Hardware, 15g


Quality wise, the Penny seems better made all around.  Penny's wheels have an inserted hard plastic cup where the bearings go, and the Yamba's wheel is just molded rubber.  The cushions/bushings are taller on the Penny, and the mounting hardware (bolts, nuts, washers) weighs a little less on the Penny.

2-Year-Old Penny cushions left; Brand New Yamba bushings right
Performance wise is where is starts to get interesting.  The biggest difference is in the deck.  While they both flex, the Penny holds its rigidity better in the middle.  I weigh 65kgs, and the Yamba sags under my weight.  While I got used to it, if you are new and hop on the board, the sag is just one more movement variable you need to compensate for in addition to the forward movement, and side-to-side roll.  I also prefer the grippier waffle pattern on the top deck of the Penny compared to the smoother, wave pattern on the Yamba.

Penny left; Yamba right

The wheelbase on the Yamba is a little longer, and I found that it is not as maneuverable as the Penny.  The Yamba tends to understeer, the Penny turns just where I want it to go.  The upside is that because I put my feet on top of the trucks, the longer wheelbase actually gives my feet more room on the deck.

The Penny turns better, rolls better, and because of the more rigid deck, feels more stable too.  Bottom line is that I prefer the Penny.  The Penny costs twice as much as the Yamba though, and if you are lighter weight rider, or are riding to get to someplace as opposed to riding for fun, the Yamba can be good value.  If you can afford it though, go for the Penny.

Amazon usually has the best prices for Penny Boards.
Oxelo Yamba boards are available from Decathlon.com


Sunday, April 3, 2016

Best GPS Apps Of 2016

Armed with GPS chips, mobile phones have become increasing powerful, and prices of such devices have fallen to levels within reach of many.  The larger screen and ability to quickly and easily update apps and maps, make them a viable replacement for dedicated GPS devices in many cases.  There are some caveats to using your phone for navigation, such as making sure you don't run out of power, and having a back-up, such as carrying paper maps or another mobile phone.  Read more here.

There is no one single best app for navigation.  Different apps have different strengths, different areas of coverage, eg. urban vs. backcountry.  In no particular order, here are the GPS apps on my iPhone and my picks for the best GPS Apps of 2016:

1.  Google Maps (Free)
Like it or not, Google is one of the best apps for GPS.  It is extremely powerful with excellent maps, including some offroad trails, a searchable data base, real-time traffic information, and turn-by-turn navigation for driving, walking/biking, and public transportation.  It requires data for use, and it is my default app at home where I have a data plan.  You can store a small portion of a map, like a city, for offline use, but that doesn't work for me, and so I don't use this app when I travel.

2.  Here Maps (Free)
Here Maps was originally developed by Nokia and is now owned by three German automotive companies - Audi, BMW and Daimler-Benz,  Map presentation is not as slick as Google Maps, but both app functions similarly.  The big difference is that it can do it Offline - meaning it does not require online data to function.  To have offline navigation capability, you will need to download the map of the country (not all countries are supported) and store that on your phone.  Once the map is downloaded, you will have a searchable data base, turn-by-turn navigation for driving, pedestrian, and public transportation.  You can also get real-time traffic information by choosing to use the app online.  Here uses its own maps, so it may be better or worse than Google, depending on where you are.

3. Maps.Me (Free)
If there is a no-brainer navigation app to download, it's Maps.Me.  For an offline GPS app with a searchable database, it's extremely responsive, fast to load app with a very small footprint.  Just to give you an idea of how remarkably compact the map data file size is, Singapore on Here Maps is a 112MB download, while it's just a 7MB on Maps.Me.  It also claims to cover every country in the world.  It uses the open source OpenStreetMaps data, which can be either good or bad, depending on contributors to the mapping database. Often, I'm able to search out locations like a small hotel or coffeeshop that cannot be found on Here Maps.  Other times, it misses completely where Here or Google Maps will find it. It offers turn-by-turn voice instructions can be enabled for driving and walking/biking, but no option for public transportation like Google or Here.  The map presentation looks quite nice, and various points of interests and landmarks pop up as you increase the scale, which is great for travellers on foot or bike to orientate themselves while moving around a city.  It's strength is being able to search out and find things that travellers would be interested in - parks, trails, coffeeshops, hotels, etc.  For my use, it has replaced Maplets on my iPhone.  I have not noticed any battery drain for Maps.Me, but I do notice that Maps.Me selects the GPS so it is always on, regardless of whether you are using the app or not. 


4. Gaia GPS (Paid)
For backcountry navigation, Gaia GPS remains my app of choice.  The availability of USGS Topo Maps for the USA and a host of other downloadable wilderness maps, and features such as being able to create a route manually on the iPhone itself, and power saving features make it a clear winner.  Gaia GPS can be used offline, and in addition, also selected for use in 'Flight Mode', which means the phone is off.  In the backcountry, this is a good thing, since it is unlikely that there is a phone signal, and your phone isn't left searching for a signal.  Note that the search function is poor, and it doesn't do turn-by-turn navigation, so it's not a GPS app for urban use.  For a write-up on navigating with Gaia GPS on your iPhone, read this.

Thursday, March 3, 2016

The Newbie's Guide to Setting Up The Sony A7s Mkii for Video

So you've got yourself a Sony A7sii, and have yet to decide how best to set up the gammas, gamuts, autofocus modes, sound levels, etc.  If you're a newbie, you've probably come to the right place.  I have been experimenting on the best ways ways to set up the camera, to get the best results for an amateur filmmaker (like me), for adventure or travel.  This means that the camera has got to be quick, easy to use and produce good results.  There are a lot of options on this camera, and I'll cover what I think are the most important ones a newbie should know.

Base Frame Rate
I shoot NTSC 24p with a PAL A7sii.  This means I get an idiotic reminder everytime I start up my camera, slowing down an already slow start up.  I do this because I prefer the look of 60 and 120 fps slowed down to 24 fps in my editing program versus the look of 50 and 100 fps slowed down to 25 fps.


Customized Buttons
I configured the C1 button to start and stop movie recording.
C2 button is set to Clear Image Zoom.  This gives a better image than simply cropping in post.  It is not useable for RAW stills, and for the 120p video mode (which is already cropped in 2.2 times).

Configuring Movie Mode
Mine is set to XAVC S 4K, 24p 100M, Aperture Priority Auto, Auto ISO, Auto White Balance, Metering Mode Multi, Continuous AF, Wide.  This is my 4K mode.  I use this when I want the highest quality (gives me options to crop or stabilize in post), or for low light (24p will give me the lowest shutter speed).  I've selected Autofocus On by default, and set to Continuous Wide on all my video modes.  Video AF is usually useable, but slow on the A7sii.  If I want manual focus, it's a quick flick of the AF/MF switch to MF, and toggle the button (see 'Back Button Focus' in Setting Up the Sony A7sii for Adventure Photography to set this up).  I use Aperture Priority and let the camera select the shutter speed and ISO automatically.   I find that works well for me and allows me some creative control while not slowing me down.  I use the exposure compensation dial if multi metering mode isn't giving me what I want.  Auto White Balance on the camera has been working well for me.

Memory 2 on the Mode Dial is set to XAVC S HD, 60p 50M, with the other settings the same as above.  This is my 1080p 60fps mode.  I'll use it when something is moving or when I might want slow motion.  It's quite a good, general purpose frame rate, and I'd use it more often, except that in this mode, the camera goes into 'P' Program mode and I can't control the aperture.

Memory 1 is set to XAVC S HD, 120p 100M.  This is my extreme slow motion mode.  I sometimes use it if I need more reach as the camera crops in 2.2 times.  It's a huge crop.  It changes my 10-18mm E-Mount lens into a more useable 22-40mm.  The camera also goes into Program mode on this setting.

Gamma, Gamut and LUTS
Gamma refers to how the camera treats the difference between the dark and the light areas of the image, and Gamut refers to the range of colors available.  A LUT (Look Up Table) converts the gamma and gamut into a 'look', in this case, a 'film look'.  To a newbie, Sony offers a bewildering choice of Gammas and Gamuts.  I scoured the internet, keeping an eye out for looks that I liked, tried out the ones I liked, and decided on one which worked best for my workflow in my video editor, Final Cut Pro X.  I use Cine2 Gamma, S-Gamut3.Cine, with the Detail (Sharpening) at -7 in conjunction with FilmConvert LUTs.  Technically, you don't need to use a LUT, but I found a yellow/green cast in my footage that was difficult to correct.  Initially, I thought this was due to the use of Auto White Balance, unfortunately, that was the color that came out of this camera.  The good news is that LUTs, like the ones used by FilmConvert, are able to take color and gamma information and, quite easily, convert it into something pleasing.

Test Settings and Grading Sony A7sii from Kenneth Koh on Vimeo.

Sound 
I find the built-in mics to be be pretty good for capturing ambient sound, and use these settings in general.
Audio Recording Level 20
Wind Noise Reduction Off

These are the settings that I'm using now.  I hope this was useful to get you started in setting up your own Camera.

Monday, February 29, 2016

Free Online Filmmakers Seminar

The world's largest free online event for filmmakers is happening in less than 24 hours.  I signed on a week ago, which means I've been getting a weeks worth of spam email... Seriously though, I've only gotten about an email a day, 'encouraging' me to sign up for their paid program.

The program looks legit, so it's worth the hassle.  Check it out at CineSummit.com


If you remember Brandon Li, whom I interviewed a while back, he's one of the filmmaker's contributing to the seminar.

Saturday, February 20, 2016

Accessories for the Adventure Shooter's Sony A7s MkII

Here are some accessories that I use for my Sony a7sii, but could work for any alpha a7, a7r, a7s mk1 or mk2 adventure shooting kit.  Some, like the SDXC Memory Cards and a Screen Protector, are what I'd consider to be 'must haves', the others are nice to have.

64GB SDXC Memory Card
I know I read this somewhere before buying my camera, but in the excitement, I forgot all about it and as a result, could not shoot 4K video until I went back to the store to buy new SD cards. Take note that SDXC cards of at least 64GB size are required, the the memory cards from your last camera might not work.  I thought the Sony's were best 'bang for buck' and that I wouldn't have to worry about compatibility issues, and got 2 Sony Class 10 UHS-1/U3 SDXC up to 95MB/s Memory Card in 128GB size.

Extra Battery
For adventure or expedition shooting, you probably won't go through as many batteries as say, a wedding shooter.  The Camera does come with 2 batteries in the box, and although I've yet to go through more than 2 batteries in a day of shooting, it's worth picking up a 3rd battery as a spare.  I stopped using 3rd party batteries and only recommend using original Sony NP-FW50 batteries for consistent performance.  Sometimes, there's a deal from Sony to purchase an extra battery when you buy your camera.  Be aware that there are fake batteries circulating in the market.

Mindshift GP2
Mindshift GP2
I keep my memory cards and batteries in a MindShift GP2. It's made for Gopro accessories, but will hold 2 SDXC memory cards and 2 Sony NP-FW50 batteries.  I number my batteries and cards, and the clear holder allows me to see which card/battery is next up to cycle.  It's lightweight and allows me to secure way to store and organize those essentials.

LCD Screen Protector
Before you take the camera out of the box, put an LCD Screen Protector on it.  I had mine for just a day before I went back to the store to put a screen protector on, and the screen was already scuffed.

Peak Designs Leash Camera Strap
The Leash, by Peak Designs
Consider the Peak Design Leash Camera Strap.  I frequently take the strap off so it doesn't interfere with me moving the camera around and either snagging (hence ruining the shot) or making some kind of noise that will interfere with the built in camera microphone.  I'm used to homemade solutions, but the Leash is the best, lightest and most adjustable design I've seen, and will allow you attach their 'anchors' directly to the camera lugs, thereby eliminating the need for the triangular mounts, which could be a potential source of noise as well.  I also bought their Standard Plate, so I could attach the strap to the plate and have the camera over my shoulder hanging lens down, a much more ergonomic position.  Note that the strap is thin, and may not be the most comfortable for heavier setups.

Think Tank Body Bag

Camera Body Pouch/Bag
I like the Newswear Body Pouch that I've been using for years.  It fits the a7sii with 24-70mm lens, but with the hood stored in the reversed.  I've recently acquired the Think Tank Body Bag, which is larger and can store the same body lens combination (or a larger lens) with the hood in place, ready to use.  These bags are the ultimate in flexibility and lightweight for the adventure shooter.  I can use them as a chest pouch, mounted as a holster on a belt, or chucked into any backpack.  The velcro flap gives quick access to the camera, but dust protection is not so good.

Zeiss Lens Cleaning Wipes and a Chamois
Zeiss Cleaning Wipes
A friend gave me a box of Zeiss Lens Cleaning Wipes and since then, I've ditched my Lenspen in favor of them.  Nothing wrong with the Lenspens, its just that I never throw the old ones away, and I just don't know which have been around long enough to have picked up enough grit on the cleaning pad to be dangerous.  The Wipes are one-time-use, so I know they are clean.  I bring one wipe for every 3-4 days, plus one spare, or about 3 wipes for week long trip.  I also carry a  reusable chamois (synthetic, microfiber) to clean, and wipe off fog or moisture from the lens.

Sea to Summit Dry Bags.
They have nicer colors.
 
Ultralightweight Dry Bag
The Think Tank Body Bag (above) does come with a waterproof cover, but for extended periods in the wet, and also for unforseen circumstances, I prefer the security of a fully-waterproof dry bag.  I use a Sea to Summit Ultra-Sil Nano Dry Sack, which is lightweight and folds small out of the way.  The 13 liter size fits my camera with body bag, and a spare lens.  Or, a plastic bag stuffed into your camera bag will do in a pinch.

Thursday, February 18, 2016

The 10 Commandments of Lifelong Fitness

Aging sucks!  There really is nothing good about growing old, except maybe I'm not so hot-headed and my ego is kept in check... Everything else, not so good.  Starting with this blog post, I've added a new 'Aging' category, to share what I've learned with you.

Ned Overend, one of my guru's on the subject, a man who manages to stay on top of his game, regardless of age, talks about how he keeps in shape in this Outside video:

Tuesday, February 16, 2016

Burma Rising

Balloons over Bagan, Myanmar.  
Myanmar, also known as Burma, is a country of contradictions.  It's a land of jaw-dropping beauty and a people who have endured decades of oppression and hardship. Until recently, it was isolated from the rest of the world, and its unique culture has survived the 21st century relatively unscathed.  Burma is rapidly catching up with the 21st century, and not all of it good.  Certain technology, like cellphones, is cheap, and even poor farmers have smartphones and can be seen texting from atop water buffaloes.  Plastic bags litter the landscape, as basic needs like trash disposal, health care, and infrastructure (power, roads, etc) are either practically non-existant.  Buddhism plays a major role in the country, providing a system of basic education, health care and a moral code for the people.
A monk grabs a photo with his cellphone at the Temple of 582,000 Buddhas, Thanboday, Myanmar.
My wife, Laura and I were there for some biking and photography/filming.  Laura is recovering from a slipped disc and was not sure how much biking she could do, and so we opted to take a supported tour from a local operator.  This turned out to be a good thing, because her back was far from recovered.  We flew into Mandalay, and visited Bagan and Inle Lake.  We also visited Yangon from an earlier trip, and clips from that trip are also included in our trip video below.
End of the day, Bagan, Myanmar
We didn't have much information on biking when we planned our trip, and we didn't know how much biking Laura could do, so we wrote to a couple of companies and asked if they could take us to the places we wanted to see, and to do some biking as well.  All the biking was planned on road, usually tarmac, but occasionally some dirt road.  The paved roads were extremely busy.
Fisherman, Inle Lake, Myanmar
Our guide was extremely accommodating, and although not a mountain biker, took it upon himself to find more dirt roads to escape the traffic.  I experienced the graciousness of the Burmese people, saw the beauty of the land, and came away with a feeling of hope for the country.


Burma Rising from Kenneth Koh on Vimeo.

Best time to visit is in the Burmese winter.  It's cool and dry in the mornings and evenings, and the quality of light for photography is amazing.  We find prices to be on the high side for South East Asia.  Hotels and transport are expensive, probably to some sort of government tax, and food and labor are relatively cheap.  Exchange your currency (new, large note US dollars are preferred!) in Burma, and buy a SIM card for your phone at the airport.