My first experience with the lightweight philosophy came in 1986, when my partners and I set off to climb the Northwest Face of Half Dome in Yosemite. Tim van Gelder, one of my partners, wouldn’t let me carry my SLR because it was too heavy. Instead, he offered to load my Kodachrome into his tiny Olympus XA. As we scrutinized the massive amount of gear needed for our climb, we whittled away at the weight, eliminating all non-essential equipment, down to the three of us eventually having to share a single spoon during our 3-day climb.
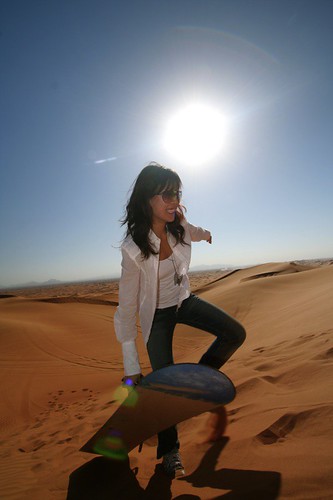
 When my team participated in The Gobi March 2005, a 7-day 250km footrace across the Gobi Desert, our packs weighed among the lightest in the field. My backpack weighed just 16lbs including my sleeping bag, clothes (for temperatures ranging between 7 and 50 degrees C) and all the food I would need for the next 7 days (water and tent excluded as they were provided by the race organizers). We kept our packs light with the same philosophy and careful selection of all our equipment.
 Whether you are racing on foot across the Gobi Desert or trekking the Annapurna Circuit, being lightly loaded allows you to move faster, more efficiently and have more energy at the end of the day. It is more than just buying lightweight gear; it is a change in mindset. It was difficult for me to accept having to share a spoon with two relative strangers on Half Dome, but I’ve learned to live with discomfort and accept sacrifices to reap the benefits of going lightweight. Here’s a list of the stuff we used and some other tips:
 Backpack
We tested out Gregory’s Advent Pro and Salomon’s Raid Race 300. Gregory’s pack is available in different sizes but weighs more than the Salomon. Either pack would have done the job well, but we elected to go with the Salomon Raid Race 300 because it was the lightest on the market (and we were sponsored by Salomon and the pack was given to me). I wouldn’t agonize over this one. Lightweight packs are devoid of frills and they are all pretty much the same. Just make sure it fits, and it comes from a manufacturer with a solid reputation so it is (hopefully) less likely to fall apart on you in the middle of the desert.
Shoes
We only considered trail running shoes manufactured by Salomon or Montrail. Both manufacturers have solid reputations. We wore Salomon XA Pro 3D shoes because Salomon sponsored us and that’s what we were given. If we had to do it again, we would recommend getting the goretex version to help keep the sand out.
Sleeping Bag
A Japanese company called Montbell also sponsored us. This company manufactures equipment of the highest quality. They have a store in Colorado that you can order stuff from. We chose their Alpine U.L. Down Hugger #5, an 800 fill down sleeping bag that weighs just 1lb 1oz. Other sleeping bags under consideration were Marmot’s Hydrogen and Western Mountaineering’s Highlite. The Montbell regular size fits people up to 5’10’’, and so is a better fit for shorter people. The other regulars fit to 6’.
Clothing
It is hard to beat Marmot’s Driclime Windshirt for its versatility. It is lightweight, packable, windproof and warm for its weight. The current version is, unfortunately, a little heavier than the earlier version we were using. We also carried a Montbell U.L. Thermawrap Vest. Believe it or not, this puffy synthetic insulated vest with was lighter than our tee shirts! Their U.L. down jackets are even lighter and I’m currently replacing my vest with one of their down jackets.
Tips from Ian Adamson, world’s best adventure racer:

- Bring a lightweight inflatable pillow for sleeping, and use your backpack to prop up your legs while you sleep to prevent the blood from pooling into your feet;
- Dried ramen noodles are an outdoor staple. Crush the bricks of ramen and transfer the crushed bits into a ziplock bag so it takes up less space in your pack;
-Don’t bother with the built-in electronic compass on your outdoor watch. Instead, clip on a small compass to your watchstrap – it’s quicker and can be more accurate.
-Bring more food than you think you will need. Double or triple the rations. You will be burning many more calories than you do back home.
-Get a Buff (pronounced ‘boof’), a tubular piece of microfiber. You’ve seen the girls wearing it as a tube-top in the reality TV show ‘Survivor’. It will pass as a hat, neckwarmer, and in case of a sandstorm, cover your face to filter out the desert sand.
Training Tips:
- The ultra long run. Walk or run a trail longer than marathon distance. Spend about 8 hours on your feet, or a distance of about 60km. Make sure you build up to this one. It should be done near the peak of your training cycle.
- Consecutive long runs. Build up to do three consecutive days of long distance runs. We tried to run three consecutive marathons, but ended up doing a run of 42km, then 30km the next day, then 20km the day after that. Make sure you get enough recovery rest days after this.
- Do most of your running off road, preferably on hilly terrain, and wear your pack for all runs. Try to find some deep sand to run on, and some boulder hopping to build strength and agility.
- Bring multi-vitamins or supplements. I don’t think there’s all that much quality nutrition in freeze-dried food or instant ramen.
- Buy a pair of shoes a half-size bigger than you use for training. By the end of day 1, your feet will fit into it. Bring thick socks and thin socks to adjust the fit.
- Try out all your gear, and food, before you leave home.
- The best knife is the mini swiss army Victorinox SD Classic. The tweezers are great as a screwdriver for your sunglasses, toothpick for cleaning your teeth, the scissors for opening packs of food and the tiny knife for skewering those blisters!
- Forget about the Camelbak. It takes too much time to fill up the bladders at the checkpoints. Learn to use the bottles they hand out.
-Lastly, don’t bother bringing cups or pots. Heat up your freeze dried food in the packs they come in, and then re-use those packs to heat up your crushed ramen. Use your knife to cut one of the issued bottles in half to use as your cup at the camp. Throw away and cut up a new one at each camp.
- Trekking poles – bring them if you think you’ll be mostly walking. Forget it if you want to be competitive and will try to run as much as you can.
Good luck to Garrett and the rest of the Gobi March 2007 competitors!
Photos:
Top: Tim van Gelder on the Northwest face of Half Dome, Yosemite.
Middle: Running the Gobi Desert 2005
Bottom: Ian Adamson dispatches words of wisdom with a smile