Adventure Nomad

Adventure Nomad

Sunday, May 10, 2009

Bike Touring Vietnam: Photography

Vietnamese Fisherman. Nikon D300, 18-200mm, 1/250, f/6.3, ISO 200. Desaturation and vignette added in Lightroom.

Road Rules of highway 1, Vietnam:
Rule #1: Right of way belongs to the ‘King of the Road’; everyone else, get out of the way.
Rule #2: To exercise Rule #1, you have to sound your horn. Therefore, the louder the horn, the stronger that right.
Rule #3: Everyone is ‘King of the Road’.


Girl Selling Lanterns in Hoi An, Vietnam. Nikon D300, 18-200mm, 1/50, f/4.8, ISO 3200.

Small towns and villages line Highway 1, and traffic can become chaotic as you approach and make your way through those towns. Earplugs and facemasks are highly recommended. Away from the large towns though, and riding Highway 1 can be quite pleasant, especially along the coast.

When riding, I found it difficult to want to stop to take a picture. It disrupts the rhythm and flow. Because it was so heavily urbanized, I’d worry about losing the bike if I wanted to ditch it and run somewhere with camera in hand. The best shots I’ve taken on this tour were in the early morning or evening when I wasn’t riding.

Round Vietnamese Fishing Boat, China Beach, Danang. Nikon D300, 12-24mm, 1/160 f/6.3, ISO 200. Conversion to B&W done in Lightroom.

I brought my Nikon D300, 18-200mm and 12-24mm lenses, and I found that combination near perfect. I’ll probably replace the 12-24mm with Nikon’s new wider 10-24mm lens, and add a remote shutter release so that I can attach the camera to my body and trigger the camera remotely for some action shots while riding. Some kind of camera support would be nice too, and I may consider adding a really light monopod to the kit.

Thursday, May 7, 2009

Vietnam Bicycle Tour: Part II

Mid-day traffic: riding with kids after the morning session. Nikon D300, 12-24mm.

Quy Nhon – Quang Ngai (2 overnight stops)
We actually took the train. The views from the train were fantastic and we wished we had ridden it instead. It is 182km and is too long for us to ride in a day, so we would have had to break up the ride by stopping overnight at Sa Hyunh (65km), Bong Son (90km), or Tam Kuan (102km). Quang Ngai is a pretty big town, but it was just an overnight stop for us.
Sleeping: Central Hotel
Eating: Com Ga (chicken rice)

Frequent rest stops are a must, as specially when the temperature rises!

Hoi An (2 days)
We stopped overnight in Tam Ky (60km), but there’s really nothing there, so if you can manage it, book it the 120km all the way to Hoi An and spend an extra day there. Highway 1 has a broad shoulder that is used by bicycles and slower traffic, so in theory, you don’t have to share the road with large vehicles. In practice though, the shoulder gets a lot of use by the local population with anything from drying grain to cutting padi stalks. Passing vehicles like to sound their horns, either as a warning or as a greeting. This got a bit on my nerves and I started wearing my Totobobo Anti-Pollution Face Mask and earplugs.
Sleeping: Ha An Hotel, rooms from $45 a night, or Phuoc An from $25. You’ll need to make a reservation before you arrive at either of these places.
Eating: Hoi An Specialties like Banh Xeo,
Shopping: Hoi An is renown for its silk and the tailors there can make a shirt or blouse for you overnight.

Getting around town, Hoi An, Vietnam. Nikon D300, 12-24mm.

Hoi An – China Beach, Danang (31km)
If you are short on time, you can end your ride in Danang, and fly or take the train to Hanoi. North of Danang, Highway 1 becomes increasingly busy and the riding less pleasant. But, if you have the time and you are still having fun, push on through to Lang Co.
Sleeping: numerous new hotels along China Beach
Eating: Seafood at one of the many beachfront establishments

Heavy traffic in Danang. Nikon D300, 12-24mm.

Lang Co (Overnight)
43km from China Beach is Lang Co. You’ll need to ride over Hai Van Pass to get there. Fortunately the ride, although tough, is rewarding. The beach at Lang Co makes for a nice overnight stop.
Sleeping: Lang Co Hotel

Cooling off on the way up Hai Van Pass. Photo courtesy Laura Liong.

Hue (1-2 days)
The citadel, historical artifacts and the good food at Hue are compelling reasons to spend more than a day here. I’d end the bike tour here and take the train up to Hanoi.
Eating: Bun Bo Hue (noodle soup) for breakfast or try other Hue specialties at Bloom Restaurant 14 Nguyen Cong Tru

A misty morning on Ha Long Bay. Nikon D300, 12-24mm.

Hanoi (2+ days)
Spend your remaining time in Vietnam with a walking tour of the city, ending it with the show at the Water Puppet Theater. Pamper yourself with a junk cruise at the UNESCO World Heritage Site of Ha Long Bay. There are over 500 junks that are registered to take tourists out onto the Bay, in variable states of disrepair. Some shopping around is required to find the best values.
Sleeping: Hanoi Boutique Hotel
Eating: Quan An Ngan

Sung Sot Cave at Ha Long Bay. Nikon D300, 12-24mm.

Sapa
We didn’t get out to see Sapa, and it was one of our regrets during this trip. If we could do the trip over, we definitely would have budgeted some time to visit Sapa.

Wednesday, May 6, 2009

Vietnam Bicycle Tour: Part I

Biking through a rice padi field off Highway 1. Photo courtesy Laura Liong.

Bike touring is a pretty good way to see Vietnam. It’s best to bring your own bike from home, but you could buy a local bike when you arrive. There are bicycle repair shops everywhere to help you if you run into problems. This was our first ever bicycle tour and we made plenty of mistakes. If we could do the trip over, we would do it sometime in the 2 weeks following the Tet New Year celebrations in January when it is a lot cooler and there’s a lot less traffic on the roads.

A girl selling balloons in front of the statue of Tran Nguyen Hai as cars whiz by at night, Ho Chi Minh City, Vietnam. Nikon D300, 18-200mm

Here’s our ideal 3-week (more or less) Bike Tour Itinerary:

Ideal Itinerary
Ho Chi Minh City (Saigon): 3-4 days
Arrive in Saigon and leave your bikes in the hotel while you make the following sidetrips:
Things to do: Visit Cu Chi Tunnels, Mekong Delta (2-days), War remembrance museum, Palace, Market.
Where to stay: one of the many guesthouses in the Pham Ngu Lau/Bui Vien/De Tham tourist area.
What to eat: Everything is good at Quan An Ngon near the Palace, but you’ve got to try the Che Suong Sa Hot Luu dessert
Things to buy: Cheap and light plastic poncho, silk sleeping bag liner.

A Cao Dai temple service, Cu Chi, Vietnam.

Dalat (1-2 days)
Take the bus to Dalat. Traffic is a little too hectic near the big cities and not much fun to ride.
Things to do: Canyoning, rock-climbing or mountain biking with Groovy Gecko or Phat Tire. Bike down to Crazy House and take a little tour of the city.
Where to stay: Dreams Hotel
What to Eat: grilled shrimp paste on sugar cane

One of the rooms in the Crazy House Hotel, Dalat. Nikon D300, 12-24mm.

Nha Trang (2 days)
It’s about 110km to Nha Trang via the “new road”. It’s mostly downhill, although undulating, so its got some ups as well as downs. It is also the only ride on this trip where you get to enjoy the mountain scenery of the central highlands.
Things to do: Dive or snorkel with one of the many dive operators in Nha Trang.
Where to Stay: There are many new hotels near the junction of Hung Vuong/Trang Quang Khai. Prices from around $25.

A boy playing on a slackline, Nha Trang Beach, Vietnam. Nikon D300, 12-24mm.

Tuy Hoa (Overnight)
It’s 126km with a couple of small hills on Highway 1. It’s a long day, but with beautiful coastal scenery and traffic is light along the new coastal highway 1D.

Laura coasting along Highway 1D. Nikon D300, 18-200mm.

Quy Nhon (Overnight)
Another long day with 113km of cycling and nice coastal scenery. Quy Nhon is a pretty nice place to chill, so take a day off here if you need it, as the next few days are filled with riding.
Where to stay: We stayed at the hotel next to Barbara’s Kiwi CafĂ© on the beach.
What to Eat: Seafood hotpot at the seafood restaurant to Barbara’s and breakfast at Barbara’s.

Fisherman's net at Quy Nhon, Vietnam. Nikon D300, 18-200mm.

End Part I

Monday, April 6, 2009

New UltraWide Zooms

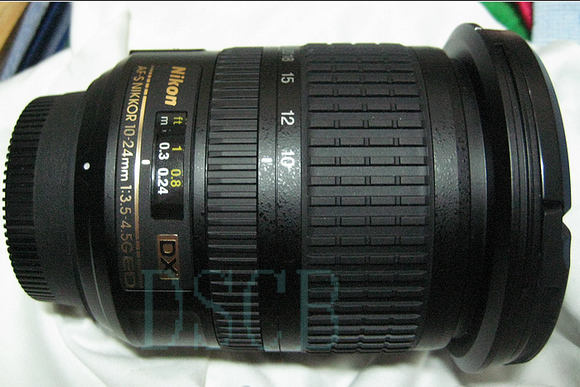
Image from NikonRumors.com

Nikon was the first to come out with an ultra wide angle lens for their DX (1.5 crop) cameras, but the venerable 12-24mm f/4 DX Nikkor lens is showing its age, and the competition for ultra wides for cropped-sensor cameras is hot.

If you are using a cropped-sensor Canon camera like the 50D or upcoming XSi/450D, you don’t need to be reading this. The Canon 10-22mm f/3.5-4.5 is optically excellent, well built and very lightweight (I still have mine and my wife is using it). The solution for Nikon users is not so clear cut.

I find I mostly use my 12-24mm Nikkor at 12mm, and often that is not wide enough. Also, 12mm is the weakest focal length of this lens. Thus I began a search for competing lenses wider than 12mm for DX Nikons and this is what I’ve found:

Nikon 10-24mm f/3.5-4.5
Still a pipe dream at the moment, but I found what looks to be a pretty authentic image on Nikon Rumors (above). If it does launch, it will probably be the lens I end up buying.

Sigma 10-20mm f/4-5.6
This was the lens I was also considering before I bought the Nikkor. I chose the Nikkor in the end, but my requirements have now changed. Optically, it has different strengths and weaknesses, but appears to be the Nikkor’s equal. Ergonomically, it is a little quirky. I feel the zoom ring is just too close to the body. Nevertheless, this is my top choice unless the Nikon 10-24mm turns out to be real.

Tamron 10-24mm f/3.5-4.5
I haven’t seen one of these yet, and there aren’t enough reviews to form an opinion.

Tokina 11-16mm f/2.8
This is one hot lens and is probably the best solution for a lot of people, just not for me. The small zoom range doesn’t bother me, but 11mm is still not wide enough. It is also the heaviest of the lenses I’ve looked at.

Trekking the Annapurna Circuit. Nikon D300, 10.5mm Fisheye lens.

Nikon 10.5mm Fisheye
A sweet optic. It is a prime lens, and I can shoot right into the sun to get nice sunstars with this with less flare and ghosting than with an ultrawide zoom that has a lot of elements inside it. I’ve probably been shooting too much with this, and magazine editors don’t seem to pick the images I’ve shot with the fisheye that much.

Wednesday, April 1, 2009

Halo Sweatband Review

The Halo sweatband technology is basically a yellow rubber seal under the fabric which forms a ‘gutter’ that channels sweat away from your eyes and down the sides of your face. The fit is important, and you need to have a snug fit with the gutter just above your eyebrows. They come in several forms: 2 types of headbands, a visor and a cap.

In equatorial Singapore, the climate can be described as hot and humid and I sweat rivers of stinging, eye-burning sweat. Outdoor Venture, my gear sponsor, gave me a couple of Halo Sweatbands to try out last year. I liked them so much, I went back and bought 2 more for myself. I consider them indispensable for training in our tropical climate.

Halo Headbands

Price: US$12.95
These come in a Tie Version (Halo I Headband) and a Pullover version (Halo II Headband). I have both and I prefer the tie version. The pullover version was designed to go under a helmet, but I’ve no problem getting my tie version under my helmet. Plus it feels more secure and I can get a better fit. The Pullover version gets looser over time and there’s no way to get a tighter fit if you have a small head. It has become mandatory gear when I bike and I’d say it is 95% effective at channeling sweat away from my eyes on the bike. My favorite color: Black.

Halo Sport Visor
Price: US$21.95I use these when I run. These tend to be a little more finicky to fit. The sweatband component is separated from the visor and you need to place the sweatband gutter just above your eyebrows. When compared to the sweatband on the bike, these are slightly less effective on the run, probably because of the head position or head movement. I’d say they are 80-90% effective on the run. If I’m running 30 minutes or less, I prefer to use a plain terry cloth cap or visor. This is because the dryline fabric of the Halo Visor doesn’t absorb much sweat, and after about 20 minutes, I’ll have a little sweat coming down my face. More than 30 minutes though, and the plain terry cloth fabric is soaked through: Rivers of sweat will be pouring down my face and into my eyes while the Halo Visor has it much more under control. My favorite color: Red.

Halo Sport Hat

Price: US$23.95
I don’t have one because I felt these fit a bit too large on me, probably because of the requirements to fit the gutter close to the eyebrows. I wish they came in sizes because I would love to have a Halo cap. If you can, try them at a store before buying it, otherwise make sure the store you are buying them at has a return policy.

Halo sweatbands, caps and visors are available in Singapore at The Running Lab, Bike Haus, or direct from Halo Headband.