Adventure Nomad

Adventure Nomad

Thursday, May 10, 2012

The Next Adventure Bike

About three and a half years ago, I wrote a piece on the Surly Long Haul Trucker titled The Ideal Adventure Bike.
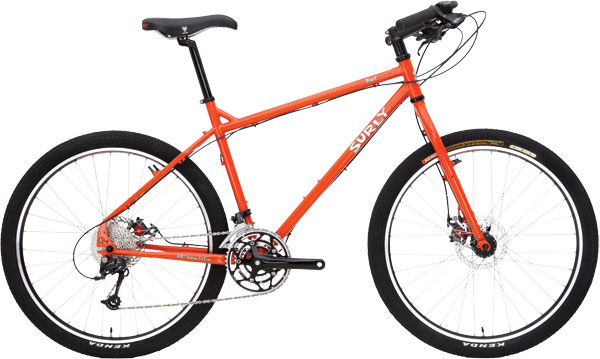
The Surly Troll.  Image from the Surly website.
We'll, my wife Laura, and I have decided that long distance road touring really isn't our thing.  We'll ride road, but prefer it leads out to some dirt.  She prefers a mountain bike setup as well.  This means we could tour on our mountain bikes (Giant Anthem X), or outfit her LHT with front suspension, flat bars, V or disc brakes, and rapid-fire shifters.  Touring with our Anthems is possible, however, since we've built up the Anthems to race, and they are somewhat precious (not to mention fussy).  Rebuilding the LHT into a mountain bike will cost us more than the stock bike, and so we began the search for our next adventure bike.
Take a few moments to get your head round this mind-boggling slot dropout, and you’ll see how clever it is. I love a bike with versatility. The Troll can run derailleurs, a Rohloff Speedhub – a third bolt anchors the OEM2 plate in place - or slim down to singlespeed. The position of the disc brake tab allows a conventional rack to be teamed with Avid’s mechanical BB7s.  Image and caption © Cass Gilbert
The search lead us back to one of Surly's strong, low cost, steel frames: The Troll.  In short, the Troll is a 26" steel mountain bike that is disc and rack compatible.  But that's not why it's cool.  The Troll can take any brake setup - disc, V or cantis; it's clever dropout design can take a Rohloff, derailleur, or single speed; build it up rigid or front suspension; and fit up to 2.7" fat tires, or big wheels like 650b (or even 29er?).
Unleash the Troll. Take it across a continent… Image and Caption © Cass Gilbert
I've never ridden a Troll, so I set out to find out more information from others who have.

Troll vs. LHT
Cass Gilbert (whileoutriding.com) has allowed me to reprint some of his thoughts on the Troll:

'So which is best for what? If paved roads and good quality gravel tracks are your staple diet on tour, you’re probably better off with a Trucker. It’s built for the heaviest of loads and from what I’ve seen, has become to go-to bike for those tackling the Panamerican Highway. But if you hanker after more challenging trails, envisage battling through muck and mud, and ride singletrack on your days off before visiting the local museum, then Troll is where it’s at. The fact that it isn’t designed to handle as much cargo shouldn’t be an issue, as by default, those heading offroad tend to pare down their kitlist.'

Read the rest of Cass Gilbert's extensive review on the Troll here.

Joe Cruz, my bike guru from the original LHT Ideal Adventure Bike post, adds the following to the Troll vs. LHT discussion:

"Where there's a mix of asphalt and dirt roads with the occasional mountain bikey singletrack (but not weeks of it), I stand by everything I've ever thought about the LHT. In a different sense, it can do anything, too. If you told me I had 600k of asphalt to cover in three days, great, can do on LHT. If you said I then had to ride 40k of mountain bike trail, yeah, LHT can do that, too. When both of those are going to show up on a single tour, that's the bike I'd bring."

Conclusion
Both the LHT and Troll are valid choices, and the bike you choose will very much depend on the type of riding you want to do (dirt or tarmac), and how long you will be out for (will you need racks/panniers).

Oddly enough, what we've taken back from this discussion is that all we really need is just a hardtail mountain bike.  We don't need eyelets for a rack/pannier setup as we travel really light, and although steel is nice, we would rather have a lighter frame that we may also race with.  So we are now looking at getting a 29er aluminum hardtail, build it up with some rugged parts, strap on some bags (like the bags from Revelate Designs) and just go ride.
Wednesday, May 2, 2012

It's Not All About Flipping Tires

There's a lot of Crossfit bashing going on, most of it directed at the elitist cult that Crossfit is perceived to have grown into.  I'm not going into that.  For me, it's about the training method and principles.  Forgive me, I'm a Crossfit Zealot.  Nevertheless, I shall do my best to break it down into what I see as the good and the bad, and how I've adapted it to enhance the enjoyment and competitiveness of my sport, activities and life.

Crossfit is a community developed, empirically driven, clinically tested strength and conditioning program.  I've been using Crossfit as my primary strength and conditioning training for more than two years, training both with an affiliate (that would be a gym with instructors), as well as on my own.  Prior to that, I used a conventional bodybuilding-based gym training approach.
Mmm... Prowlers... My favorite workout!  Photo © Laura Liong
Constantly Varied
You don't get to choose your workout.  In essence, your Crossfit workout is 'randomly' selected out of a hopper and could range from heavy weightlifting, to fast sprints with gymnastic movements, and could last from a few minutes to over an hour. 

The Good:
We tend to choose to do what we like to do and avoid doing what we don't like to do.  This leads us down the dangerous path of training our strengths and avoiding our weaknesses.  A varied, randomized workout avoids this.  It's training for any and all contingencies, the unknown and unknowable.  This type of training works well for the person who needs to be a generalist: Soldiers, firefighters, law enforcement officers, and some athletes (like mountain climbers, rugby players, mixed martial arts fighters). 

The Bad:
If you are a specialist, for example an athlete involved in a sport requiring high skill, in a known environment for a fixed time (like an indoor track cyclist), then you may need more than the generalized training that a pure Crossfit program provides.  If you have a coach who can identify your strengths and weaknesses, you would benefit more by targeting your specific weaknesses, than from a generalized program.

My Take:
These days, I train Crossfit on my own, usually twice a week.  I choose my workouts based on the longer term goals of my training program, a race or event.  I'm at risk of falling into the trap of training my strengths, but it's a compromise given the time I have.
A broken foot is no reason not to workout.
Functional Movements
This is the current buzz word at fitness centers worldwide.  What does it mean?  Functional movements are how your body naturally does real-life work, like lifting things.  Your body knows to move that way because the movements are naturally efficient, powerful and safe.  For example, lifting a heavy sack of potatoes efficiently to your shoulder would be a movement called a 'Clean'.  The clean is naturally the most powerful, and hence efficient, way to lift a load from the ground up to shoulders.  Executed at a high skill level, it is part of an Olympic lifting movement. Examples of other functional movements are squats, running, and pull ups.  Functional movements are proven to illicit a high neuroendocrine response which in turn does a whole lot of good things to your body, like increasing bone density and human growth hormone.

The Good:
Form follows function, and unlike some other workout programs that focus purely on cosmetics, Crossfit uses functional movements almost exclusively because their goal is making you stronger, faster and more durable.  Most workouts can be done with simple equipment: a barbell with weights, medicine ball, kettlebell, jump rope, pull-up bar and some space to run. 

The Bad:
Although natural, some complex functional movement patterns need to be taught, because our bodies haven't learned the coordination and sequencing needed to do those movements.  For example, the Clean.  Crossfit is one of the few training programs that still teaches the Olympic lifts - The Snatch and The Clean and Jerk.  Both of which are excellent power builders that induce a profound neuroendocrine response.

My Take:
I haven't stepped into a conventional gym in years.  Years of spending time on machines doing isolation movements like leg extensions and leg curls haven't done much for me.  The proof is not in looking at yourself in the mirror, it's in living your life, now and in the future.  If you lose the ability to squat (a functional movement), you lose the ability to walk up stairs or lift yourself up off the ground.  In short, you lose the ability to live life independently.  No amount of leg extensions or leg curls will give it back to you. 
Someone to Watch Over Me.  Supervision plus motivation: another reason to workout at an affiliate.
High Intensity
The heart of the Crossfit program is that the workout, ie. the constantly varied, functional movements, is executed at a high intensity.  Why?
To answer that question, we have to get scientific:

(force x distance / time) = Power

That is the definition of power.  The less time it takes to do a given amount of work, the more power.  In simple terms, Power = Intensity.  The more intense the workout, the more power you are putting out.  Training for more power will improve just about any sport.

The Good:
There is increasing evidence that shorter, high intensity workouts are far more beneficial than long, slow workouts.  They are also very time efficient.

The Bad:
High intensity workouts hurt.  A lot of beginners are turned off by this sort of training.  The loss of form as fatigue sets in is one of the bones of contention that Crossfit objectors raise.  Functional movements are inherently safe, however, it's best to work out at an affiliate where others can watch and correct your form.

My Take:
High intensity training works. However, it is strong medicine and I have to be careful about doing too much, which can quickly lead to overtraining.  I scale down both the load (weight) and number of sets as required.  If I feel the need, I'll even substitute a functional strength training session instead of Crossfit by removing the intensity.

Bottom Line:
It's not for everyone.  Check it out and decide for yourself.  Learn more at Crossfit.com

If you are in Singapore, try one of the affiliates:
Crossfit Singapore; or
Reebok Crossfit Enduro

Saturday, April 21, 2012

A Black Hole


The past six months of my life have been something of a black hole, sucked up by a mountain bike race in South Africa called the Cape Epic.  During the three months leading up to the race, I biked an average of 1000km a month, climbing over 37,000m... and it still wasn't enough.  I failed to complete the race with my teammate.

It wasn't a total loss.  I learned a lot too.  Still photography is difficult to do on a bike, and even more difficult to involve a viewer in the action.  But strapping on a small video camera to capture moving footage on a bike is relatively easy to do and easy to involve the viewer, and I so began the  process of learning how to shoot video.

GoPro HD Hero
I bought myself a GoPro HD Hero camera with various clips and attachments, and a Panasonic Lumix DMC-GH2 with 14-140mm kit lens, a Panasonic 7-14mm f/4.0 wide angle zoom, and a Panasonic LUMIX G 20mm f/1.7 Pancake Lens.  I also bought Final Cut Pro X, and along the way, learned that the iPhone 4s makes a pretty good video camera ;o)

Since my Cape Epic race was a bust, I thought I'd show you a couple of my training trips, and share a little of what I've learned about shooting video on a bike.   Keep in mind I'm still learning this stuff, so if you've got some feedback for me, I'd love to hear it.
Olloclip Quick-Connect Lens with Glif Tripod Mount

Here's an early trip in December last year.  I shot this entirely on my iPhone 4s and edited the footage on FCP X.  Since then, I learned that the iPhone makes an excellent bike touring camera.  With IOS 5.0, you can turn on the camera and shoot one handed.  It's not really wide enough when shooting video as the iPhone crops down a bit, perhaps because of the image stabilizer.  I'll probably buy the Olloclip Quick-Connect Lens Solution,  which gives you 3 lenses in one - fisheye, wide-angle and macro lenses.  I probably also pick up the Glif Tripod Mount which I can use with a small Joby Gorillapod.


This second video is from a trip to Northern Thailand in March this year.  I had learned a little more.  Compare this video to another from an earlier trip to Thailand in February Here.  In this one, I've incorporated a greater variety of shots and blended them better into the action.


There are many places you can mount a GoPro.  I tried to incorporate a variety into the final production.  In this video, I shot from my helmet, forwards and backwards, used the Chest Harness, shot from under the down tube and from the handlebars.  If I have a preference, it is to shoot mainly from the helmet.  It collects less dust and water that way, and can be slightly more stable than from the handlebars, and can be changed quickly to face either forwards or backwards.  Also, If you need to handhold the camera, it is easier to remove your helmet and shoot holding your helmet with the camera on top than it is to unscrew the GoPro from the handlebar mount.  Putting your helmet with camera on top also makes a good impromptu tripod.  Because I can't see what I'm shooting, I generally shoot in 4:3 mode (960p Tall Mode r4) and then crop to 16:9 if possible during post-processing.

Here's what I would do more of in future:
1. More pre-planning;
2. Use copyright free music;
3. Steadier shots with a tripod;
4. Clean the camera lens more often;
5. Risk more - attach the camera lower on the bike to show wheels, or derailleur.


Sunday, April 8, 2012

Nikon D800: Hey, Who Moved My Cheese?

Nikon D800
 Wow! 36MP and one of the best performing sensors we have ever seen, the Nikon D800 is a game changer.  Some are saying it's too much camera.  It's not.  In a few years, 36MP won't seem like a lot, and if you buy the D800 now, it 's likely you won't need an upgrade for a few years.  The question I'm asking myself is: Do I need this camera NOW? 

Like many others, I'd been waiting anxiously for the D700 replacement for a LONG time.  It never came.  Instead of taking Canon's approach of making smaller, evolutionary changes to their product lineup, Nikon has chosen to take a revolutionary step up.  The thing is, when I examine my needs (how I shoot, and what I shoot for) I don't really need the D800 now.   

To me, the D800 is more like a medium format camera in a smaller, lighter sized body.  I would have to employ medium format techniques and the best lenses to maximize the potential of the D800.  That means I would have to slow everything down, maybe use a tripod, and use heavier, 'professional' lenses.  It's also a touch slow at 4 frames-per-second out of the box.  There's a DX mode, which looks useful for someone transitioning out of their cropped Nikon bodies, but it's not a reason why someone buys this camera.

The D800 would really suit a variety of commercial photographers: like wedding, portrait, product or nature; where the subject isn't very active, and the end result requires very high resolution with a very high dynamic range.  For travel and adventure, I need a camera that is more versatile.  My D7000 is lighter, shoots at a higher frame rate out of the box, and gives me more than enough resolution for stock photography and magazine prints. 

Friday, March 16, 2012

So, you want to climb Mt. Everest...

Sunrise at 8500m on the North Ridge of Everest. Photo by Jamling Bhote.
So you've got it in your head that you want to climb the big 'E'.  It's coming up to a year since I climbed Everest, and I still get asked a lot how to go about doing it.  I'm not an expert, but I did do a lot of work researching, planning, and training for the climb.  So for what it's worth, here are 10 tips that I'd like to share:

1. Weigh The Risks
Climbing Everest is not that difficult technically, but it is one of the more risky climbs you can do.  Despite improvements in equipment and weather forecasting, someone dies on Everest every year.  Last year,  there were 131 summits from Tibet (where I also summitted) with 1 death, and 277 summits from Nepal with 2 deaths.  You need to think this over, and maybe talk it over with your family.
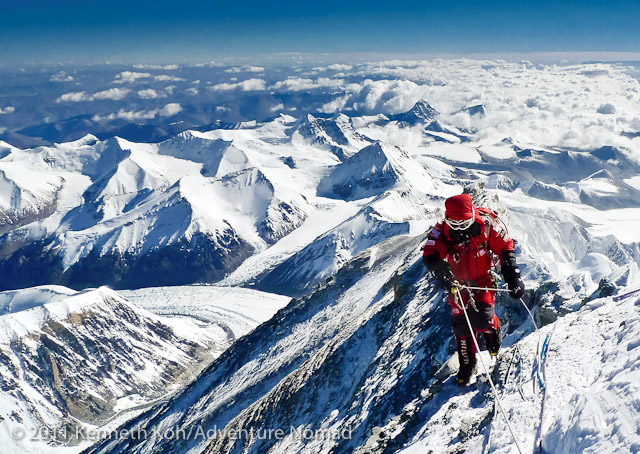
At 8700m on the way to the summit. Photo by Jamling Bhote.
2. Build Experience
Climb everything: rock, snow, ice.  Learn to move efficiently over different terrain and conditions with a heavy pack, boots and crampons.  Get used to clipping into and out of anchors and ropes.  Learn to work a jumar ascender until it becomes second nature: on summit day, you will be doing this with very little oxygen, little sleep, and with bulky gloves or mittens on.


3. Find Sponsors
Climbing Everest is an expensive venture.  Today, it will cost about USD$40,000 - $60,000 (excluding equipment and training), depending on the logistics provider you choose and whether you decide to climb via the North (Tibet) or South (Nepal).  Ideally, you can pay for this yourself.  If not, the search for sponsors can take some time, and it would be best to start this process early.
Our little group (Jamling, me and Pujung) 30 minutes from the summit. Photo by Kaji Sherpa.
4. Personal Sherpa
Get advice from other summiteers on who the best personal sherpas are, find one, and book him early.  A good personal sherpa will ensure that the hundred and one things to take care of on your summit bid (oxygen, food, etc) are taken care of, and be a reassuring pillar of strength as you climb above and beyond your previous limit.  I used Jamling Bhote (jamlinglama@yahoo.com), a 7-time Everest summiteer, and booked him a year in advance.  During my summit bid, I had some reservations as we were climbing in brutally cold and windy conditions.  I didn't have 8000m experience, or a guide, and so I looked to Jamling for guidance.  Jamling confidently told me that it was just a normal day on Everest.  We pushed on and made the summit an hour and half later in improving conditions.

4. Specific 8000m Experience
Beyond building general climbing experience, you should also test yourself and your equipment on an 8000m peak.  You also get to become familiar with using oxygen systems.  Cho Oyu is a great mountain to build 8000m experience, and the main climbing season is in Autumn, about six months prior to the typical Spring season on Everest. 

6. Equipment
Buy the best best and the warmest gear you can afford.  In good conditions, you can summit in almost anything, but when conditions aren't ideal, you may still be able to summit in warmer gear.  For example, use a one-piece down suit and not a two-piece.  The one-piece will be lighter and warmer.  Similarly, buy and use the best and warmest boots, preferably relatively new, and not some 5-year old borrowed boots.  I used the Millet Everest boot, which are supposed to be the warmest of the high altitude boots.  My toes were freezing, and if not for the chemical toe warmers inside, I doubt that I would have summited.

7. Training
There's a difference between building experience and training.  Think of building experience as an ongoing process of accumulating knowledge which can take many years, and training as physical preparation which covers several months leading up to an expedition.

There are 2 main types of training you need to do: Sport Specific and General Physical Preparedness (GPP).  Sport specific training should form the bulk of your training, and for mountaineering, it is simply doing a lot of mountaineering, or if you can't get out to the mountains, it can be done by carrying a heavy pack plus ankle weights (to simulate the weight of boots and crampons) and walking up and down hills or stairs.  GPP is training for any and all contingencies.  For example, walking up and down stairs won't necessarily give you the ability to jump over crevasses, sprint for cover, or move heavy loads of expedition gear.  You'll need to do some other type of training, and the best I've come across for this sort of thing is CrossFit.  If you're not familiar with CrossFit, think of it as gym work on crack.  It combines Olympic weightlifting, gymnastics and cardio into a short, intense session. 
CrossFit at CrossfitSG.com. Photo by Laura Liong.
8. Hypoxic Training
I bought a used hypoxic generator which removes oxygen from the air you breathe.  There are several different ways to train with this device, and I used them all.  One of the ways is to sleep in it.  I spent the six months leading up to my Everest expedition sleeping inside an oxygen deprived tent (on the floor with a thermarest and sleeping bag).  It aids acclimatization during the early stages of the expedition, keeping nausea and headaches at bay and allowing you to eat and sleep better, giving you a head start in staying healthy.
Hypoxic training at '4,800m'.  Doggies on the bed, I sleep in the tent on the floor.  Photo by Laura Liong.
9. Stay Healthy
Everest is a two-month long expedition, but it all boils down to the seven-days of your summit bid.  If you fall sick (catch an infection or get a stomach bug), you risk losing your chance for the summit.  You need to eat well, ensuring adequate protein intake, which could be difficult.  I brought a Meal Replacement Powder (MRP), and it was useful at the higher camps for the times when I couldn't eat solid food.  Fresh produce may not be readily available, and I chose to supplement my diet with fish oil, probiotics and a multi-vitamin.  Jamling and I also used Silver Sol, a broad spectrum microbial (kills bacteria, viruses, and fungus) throughout the expedition.  I also used a Totobobo Anti-Pollution Face Mask during the drive in to basecamp.  Some links below if you want to buy any of this stuff.

10. Actively Seek Advice
There are not that many people that have climbed Everest (By being the last to summit in Spring '11,  I became the 3436th person to summit).  Still, you can find useful information online.  Alan Arnette and Project Himalaya are a couple of good websites to start with, and eventually, I climbed Everest with Project Himalaya.  I'm also lucky that a few of my friends have also summited Everest.  They were my inspiration to climb Everest, and also an unlimited source of information.

There you have it.  Best of luck!
The Summit... Yay!  Image taken off video captured by Jamling Bhote.
Here are the Supplements I use:
Now Foods Super EPA Fish Oil
Now Foods GR8 Dophilus Probiotics
Now Foods Adam Multi Tablet
Silver Biotics (Silver Sol)
BSN Syntha-6 Vanilla Ice Cream MRP
If you order any of the above from iHerb, please use discount code KOH756 to get $5 off your first order (I get 2% of the sale too - Woohoo!)


Totobobo Anti-Polution Facemask - Use discount code adventurenomad at checkout to get a discount.