Adventure Nomad

Adventure Nomad

Sunday, November 23, 2008

Essential Gear for Jungle Trekking

St. Luke’s Prickly Heat Powder
Also sold as “Snake Brand”, this powder is widely available throughout South East Asia. It is marketed as “the original cooling, refreshing and soothing powder, which is effective in relieving itching, prickly heat rash, and skin irritation from hot weather”. One of the active ingredients is Triclocarban, which is an anti-bacterial and anti-fungal agent.

Adidas Kampung
These are cheap, super sticky rubber soled shoes with rubber uppers. I used my TNF Hedgehogs Mid GTX XCR and they were probably better performers, but at many times the cost. The ‘Kampung’ Adidas will do the job for only RM$5 (about USD$1.40) a pair. The only problem is that they may be hard to find outside of the kampung (village).
Adidas Kampung images courtesy of shoesjournal.blogspot.com

Homemade Citronella Repellent
I hate creepy crawlies, especially leeches. I keep them out by liberally applying DEET on my ankles and on my feet before I put my shoes on in the morning. It’s worked well for me, but the problem is that DEET gets absorbed into the bloodstream through the skin and long-term use has been linked to neurological damage, liver damage and cancer.

My friend Kiwi, who is much more experienced in the Jungle, uses a homemade concoction that can be more effective than store bought versions.

Kiwi’s Citronella Repellent Recipe
5% Citronella Essential Oil
45% water
50% Oil base (baby oil, virgin coconut oil, sunflower oil etc)
Mixed in a small spray bottle.

A Hammock
Sleep off the ground if you can. If you have to sleep on the ground, try to use a tent with a bathtub floor - A waterproof tent floor where the edges connect with the tent wall a few inches above the ground. This will keep the creepy crawlies out. If you have to sleep on the ground without any of these, clear the ground completely of dead leaves, which could hide leeches, scorpions or centipedes.

Wednesday, November 19, 2008

Cemerong-Berembun-Lansir Hike

The guys chilling out in the Sungei Cemerong. Nikon D300, 18-200mm,1/80 f/8, ISO200.

I’ve just returned from a 3 day/2 night backpacking trip to the Cemerong Forest Reserve in Terengganu, Malaysia. Malaysians are lucky. They have miles of pristine jungle trails and rivers of cold, crystal clear water.

Hiking, and lovin' it... NOT! Nikon D300, 10.5mm, 1/10 f/4.5, ISO200.

My friend, Kiwi, who runs the nearby Paka River Camp, invited me along for this trip that he’d organized for his son and a few of his son’s friends.

Come On In! The Water's Great! Nikon D300, 10.5mm, 1/50 f/8, ISO200.
From the Park Headquarters, we hiked from the bottom of Cemerong Waterfall to the top. At 640m, Cemerong Falls is one of the highest waterfalls in Malaysia. At the top, we did what must be the most insane thing I’ve done this year! We crawled over slimy rocks, slick with flowing water, out into the middle of the waterfall and peered down over the edge! I’m sure it must be safer than it looked to me because Kiwi wouldn’t let his son (or his son’s friends) do something stupid and dangerous.

Getting our 'macho' shot at the top of Cemerong Falls. From left: me, Yogi, Kisnu (our guide with the blue hat, obscured), Kelvin and Ee Feng. Marvin is taking the picture.

We spent the night in Camp ‘Y’ and hiked over the top of Gunung Berembun (1034m) the next day to Lansir Falls. It was a beautiful walk along a small trail beside the Sungei Lansir stream. The trail would crisscross the stream a few times. We spent our second night camped out on the granite shores Lansir Falls. Unfortunately, I don’t have any photos to show you because my camera died on the morning of the second day.

Friends helping out each other during the trek. Nikon D300, 10.5mm, 1/60 f/4.5, ISO1000.

The distance hiked each day was short, but if you looked at the distance and were expecting a short and easy walk, you’d be mistaken. The hiking was fairly technical, which is typical of this sort of jungle trek. There were a number of stream crossings, and some pretty steep ups and downs. In places where the trail splits, there may be no obvious signs which way to go. That, plus the lack of good maps, means that if you want to do this walk, you’ll probably need a guide. I suggest you email Kiwi at pakarivercamp@gmail.com or check out his website Paka River Camp for a heads up.

Kiwi (extreme left) supervising a Stream crossing. Nikon D300, 10.5mm, 1/100, f/4.5, ISO200.

On the third morning, we hiked back out, stopping along the way for yet another swim in another crystal clear, cold stream.

Sunday, November 9, 2008

The Homemade Alcohol Stove

Mark Jurey's Penny Stove. Photo by Forbes Conrad.

The lightest, cheapest, most reliable, easy-to-find-fuel-for, stove may be a homemade low-pressure alcohol stove.

Like a lot of backpackers, I’ve owned an assortment of stoves over my lifetime: Coleman (white gas), MSR (multi-fuel), Camping Gaz Bluet (canister), Esbit (solid fuel), Snowpeak Giga (Canister). My biggest problem is taking the stove on international flights, and finding fuel for it at my destination. I’ve never had an alcohol stove, but it seems to solve both these problems.

The low-pressure Penny Stove, designed by Mark Jurey, may be the best of the homemade alcohol stoves. Instructions on how to make your own can be found here. If you are unable to find a suitable Heineken can, you can make a similar stove out of soda cans, like this:


There are some precautions to be taken when using an alcohol stove. Tipping over a lit alcohol stove and having that spilled fuel ignite in a tent can be disastrous. Another drawback of this stove is that the flame can be almost invisible and trying to top up a stove that is still lit can be… er… very bad.

One good thing about making your own homemade alcohol stove (other than saving money) is that you will be recycling aluminum cans, and keep another gas canister out of the landfill.

Update Nov 13:
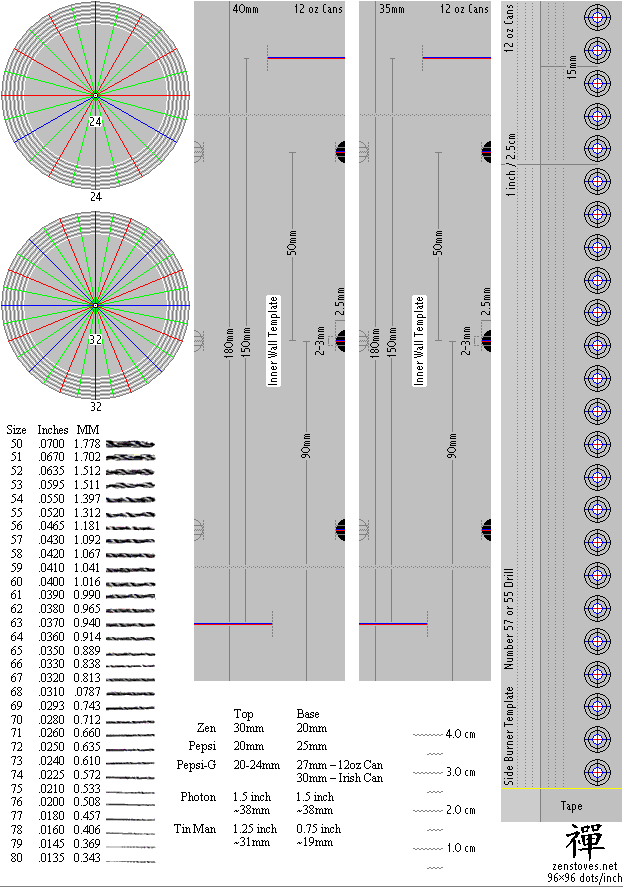
Well, I've built my first Soda Can Stove. It took me about an hour and some. The design is pretty forgiving. I didn't didn't use any high temperature tape or adhesive, and I used the smallest drill bit I had (1.5mm) and made just 8 holes. It works well. Here's a template to help you out, courtesy of zenstoves.net. Incidentally, here in Singapore, our Heineken cans are shaped just like regular beverage cans, so I couldn't make Mark Jurey's Penny Stove.

Friday, October 24, 2008

How To Buy Your 2nd Mountain Bike

The Perfect Ride. Canon XT/350D, 10-22mm, 1/60 f/5, ISO400.

We’ve all made mistakes with our 1st mountain bike, perhaps buying a cheap, heavy, klunker that didn’t fit right. Now you’re ready for your next bike and are determined not to repeat the mistakes of the past. While you may have bought your first bike as a complete bike set from the showroom, your next bike is likely to built up, ie. buying the frame, wheels and other components separately. This gives your bike a more personal feel and you end up only paying for what you really want on the bike.

Do your research
There is more to building a frame than welding a bunch of metal tubes together. Full suspension or hardtail? Aluminum vs. Titanium vs. Carbon vs. Steel? V-brakes or Discs? It comes down to personal preference, riding style, riding conditions, and sometimes even marketing hype. Websites like www.Mtbr.com have a wealth of information and reviews.

What I ride: The 2006 Santa Cruz Superlight. Single-pivot full suspension aluminum bike with V-brakes. I travel with my bike and I need something light and simple.

Going places with my bike. Hoisting my Santa Cruz Superlight across a bamboo bridge in Northern Thailand. Taken by Laura Liong with my Pentax Optio 43WR, 1/160 f/6.9, ISO 64.

Don’t buy cheap components
Go Shimano XT or XTR if you can afford it. Upgrade lesser parts to at least Shimano XT, particularly the rear derailleur and cassette. LX is ok, but XT components are much more durable and are much more pleasant to use than lesser components like (shudder) Alivio. The cheap cassette on my first bike wore out after three months. The cheap headset on my 2nd bike needed to be changed after just 2 weeks. By comparison, most of my Shimano XTR parts have been with me since 2002. Sure, parts do wear out over time, but good components last much longer and will pay for themselves over the long run. You'll also get a more positive riding experience.

What I use: Shimano XTR except for SRAM X0 twist shifters and rear derailleur.

Get Fit
A proper bike fit is more than straddling the bike and checking the clearance between your crotch and the top tube. It is best if your bike shop can do a proper fit, otherwise websites like www.competitivecyclist.com have a mountain bike fit calculator that uses a few simple body measurements like your inseam, torso, forearm length, and give you output such as what standover height, top tube length, stem length you need. It’s free and it takes about 20 minutes. It is well worth the time and effort. You may find out that your dream bike manufacturer may not make a frame in your size. For example, I liked the Specialized brand, but they didn't make a frame that would fit my long torso/short legs body. They made a 15.5" frame that was too cramped for me and a 17" that didn't have sufficient standover clearance. I had to look elsewhere.

Ride it
Finally, there’s nothing like riding the bike you want to buy. Ideally, your buddy is your size and has your dream ride that you can borrow, otherwise your bike shop should let you take a quick spin around the parking lot. Sometimes, a quick ride is enough to reveal that your dream ride isn't it all what you thought it was going to be.

Updated: 26 Oct 08 (expansion and clarification).

Thursday, October 23, 2008

When Gear Lust Strikes

AF-S NIKKOR 50mm f1.4G

Nikon has announced a new 50mm lens with a ‘Silent Wave’ motor, the Nikon 50mm f/1.4G AF-S, but at $USD 440, it ain’t cheap.

With the announcement of this new lens, it occurred to me that I could now get a pretty good deal on a used non AF-S 50mm f/1.4. I began researching the older, non-AF-S 50mm lenses, like the f/1.4 and the f/1.8. Then it struck me. When would I use this lens? While it sounds like it will make a good portrait lens on my D300, I prefer to do portraits with a zoom lens like my Sigma 50-150mm f/2.8. For general low light photography, I’ve found the 50mm focal length to be a little too long on my D300, and I’d be better off with a Sigma 30mm f/1.4. I suppose I could benefit from the sharpness of the 50mm prime lens for product photography, but that’s not really my thing, and I don’t do much of it.

In the end, the urge to buy something new and shiny has given way to reason (for now ;)