Adventure Nomad

Adventure Nomad

Saturday, July 31, 2010

Q and A with Stefen Chow


Stefen is a Nikon sponsored, award-winning, commercial photographer based in Beijing, China. He is also an accomplished mountaineer, and summited Mt. Everest in 2005. Stefen began shooting over eight years ago when he was nominated to be the team’s photographer for his Mt. Everest expedition. He turned pro four years ago and hasn’t looked back.


Q. For your commercial work, what are you mainly shooting with?
A. For bodies, a Nikon D3x and a D3s. For lenses, mainly primes and f/2.8 zooms.

Arc welding on a supertanker in the Keppel shipyard, home to the world's largest vessel conversion facility. ©Stefen Chow
Q. How different is your equipment when shooting mountaineering?
A. In the mountains, weight is an issue. I strip it down to what is basic and essential. Having said that, I always carry backups: like a backup body and a backup media storage device.

When I recently climbed Denali, I carried a Nikon D3x and D3s, one body to back up the other; and a 24-70mm f/2.8, a 180mm f/2.8, and a 45mm tilt-shift lens. I also carried a full sized tripod and 10 batteries. All in all, about 40 lbs of camera gear. I’m told I had the heaviest photography gear on the mountain that season!

A climber after a 18 hour round trip climb to the summit of Denali in Alaska, USA. ©Stefen Chow
Q. Have you any thoughts about going lighter?
A. At the moment, I’m not able to find a compromise between size and weight vs. quality and reliability. The D3x has been supremely reliable, and I’ve had no problems with it, not even with the batteries in the cold of Denali. I’ve abused my D3x from day one, and it has never failed me (knock on wood), never been fixed or repaired.

The pro lenses I choose to use on the mountain also don’t fog up within the elements, something that might happen with lighter consumer grade lenses.

Climbers moving at 7600m, above camp 3 on mount Everest. © Stefen Chow
Q. What’s your post-process like?
A. I use Lightroom to get the colors right, then Photoshop for further processing as it gives me more control. One thing I don’t do, however, is sharpening my images. I process each and every image manually and it may take me up to a month to go through the 12,000 images that I shoot on a typical climbing trip.

 A group of Hasidic Jewish boys taking a breather between prayers in a synangogue in Brooklyn, New York. ©Stefen Chow
Q. What’s new on the horizon for you?
A: I will be busy doing shoots across Singapore and China, while I have 3 exhibitions planned over the next 6 months, including a solo exhibition on my mountaineering work in a museum in Singapore on the first quarter of 2011. I am also in discussions of writing a book on my photography, and still trying to keep my personal life and other things on a constant juggle. It will be more challenging than ever, but something I enjoy on a daily basis.

Stefen, thanks very much for the interview and your time.

For more information on Stefen and his work, check out his website: http://www.stefenchow.com

Sunday, July 11, 2010

Silver Sol: Cure All or Snake Oil?

As a traveler to remote locations around the world, often in areas where medical care may not be readily available, I've learned to pack a pretty complete First Aid kit.  As a traveler, I also like to keep my packs small, light and simple, and so I'm always interested whenever I learn of a product that will fulfill multiple roles.  Silver Sol is one such product.

Silver Sol is simply silver particles dispersed in purified water.  It is a broad spectrum antimicrobial that promises to destroy bacteria, viruses, fungus and certain diseases.  This single product can be used topically to fix jock itch, disinfect and treat wounds; dropped in water to purify it*; or it can be taken orally to treat illness, with NO side effects.  Here's a list of what you can use it for.

* Note: Silver Sol will not kill protozoa or amoeba, hence it's use in purifying water is limited and is not recommended for backpackers.

Here's a pretty good 2 minute spiel on what this stuff IS and DOES:
 
© www.patentedsilver.com

Sounds too good to be true?  I remain skeptical, but an increasing body of evidence, both anecdotal and scientific, suggests that this product not only works, but works well. Silver Sol is patented by American Biotech Labs, and I ordered a couple bottles of Silver Bioticsto try out ;o)


Update Mar 2011:
Ok, so I've been using this stuff for over six months and I'm convinced it works.  It's on my packing list when I climb Mt. Everest next month!

It works best for me internally, and I put mine in a small spray bottle and spray 3-4 squirts (about a teaspoon dose) directly into my mouth, twice a day when traveling or at risk.  I've seen people I travel with fall sick, or get some kind of food poisoning, while I remain ok.


I've found it works less well externally, so on cuts, scrapes, burns, fungus like athletes foot, etc, it may be better to use the gel form of Silver Sol, which would stay on longer.  However, to keep it light and simple, I haven't bought the gel, and simply spray my Silver Sol liquid externally.


The best price I've found for this stuff is on Amazon at $20.06 for a 16 oz bottle.  The catch is you have to buy 2 bottles to get this price:  American Biotech Labs Silver Biotics 16 oz ( Multi-Pack)


Wednesday, June 16, 2010

Borneo Surf and Turf Adventure

Diving Sipadan, Malaysian Borneo

Sabah, East Malaysia, has heaps of potential for adventure tourism.  A couple of top picks are a climb up Mt. Kinabalu, South East Asia's tallest mountain, and diving Sipadan, rated one of the top places in the world to dive.  If you've got a week, you can do them both!

Sunrise on the Summit of Mt. Kinabalu

Day 1
Pick up from your hotel in Kota Kinabalu and drive 2 hours to Mt. Kinabalu National Park, where you will register for the climb and pick up your guide.  It is about a 5 hour climb up to Laban Rata hut where you will spend the night.

Descending Mt. Kinabalu

Day 2
The day begins with an early 2:30am pre-dawn hike up the hill using headlamps.  It takes about 3 hours to reach the Low's Peak summit, and if you time it right, you should arrive in time for sunrise.  Then it is a long, knee-busting hike back to the hut for breakfast, and then all the way down.  The day ends with you being dropped off back to your hotel in Kota Kinabalu.
Kapalai Island Resort

Day 3
Take a 45-minute flight to Tawau, and transfer to speedboat for another 45 minutes.  We stayed at the Kapalai Island resort, which is a resort built on stilts over the reef.  It is absolutely gorgeous!  We saw turtles and a small Manta or Devil Ray right from our room!  If you've arrived in the morning, you can do the required orientation dive at the Kapalai 'house reef' that afternoon.

Diving off the 'Oil Rig' at Mabul

Day 4
Permits to dive at Sipadan are scarce.  The park controls the number of visitors and allow only 120 divers a day.  Kapalai Resort is allowed 14 divers a day.  Generally, a 3 night stay at Kapalai Resort will entitle you to 1 day's diving at Sipadan.  The rest of the dives are done at the other nearby island reefs, such as Kapalai, Mabul and Siamil.

Diver below a ball of schooling Jack fish, Sipadan.


Day 5
The boat leaves Kapalai at 5:30am so that you are ready to sign in when the office opens at 6am on Sipadan Island.  No time is wasted, and you'll get 4 dives while at Sipadan.  The diving at Sipadan is outstanding.  The other reefs pale in comparison.  While your time at the other reefs is spent poking around in the sand looking for macro life, at Sipadan, there's plenty to see: Turtles, sharks, schooling Jack and barracuda are everywhere.

Ho Hum... Another Green Turtle...

Day 6
This is a non-diving day to allow for the 24 hours recommended between diving and flying.  Depart Kapalai by speedboat, transfer back to the airport and fly back to Kota Kinabalu.

BBQ night at Kapalai Resort

Day 7
Leave Borneo for home :o(

Saturday, June 12, 2010

Adventure Camera: Full-Frame vs. Crop-Sensor DSLRs

Every once in while, I get asked a camera question, such as: Should I get a full-frame camera like the Nikon D700, or crop-sensor like the D90?  In terms of cost, weight, and perhaps image quality, they are very different.  Here's how I look at it: 

Nikon D700.  Image courtesy of Nikon.

First off, determine you image quality needs.  The biggest difference between full-frame and crop sensors shows up at higher ISOs.  Differences also show up if you crop or edit heavily.  In other words, if you shoot at low ISOs, shoot JPEG or rarely post-process your shots, it might not make that much of a difference.

Secondly, determine the lenses you would like to use.  The camera and lenses work together and are a part of the total image quality equation. You'll need high quality lenses to reap the benefits of whichever body you choose.  The choice of lenses is determined by how and what you shoot, and also by the format of the camera body (ie full-frame or crop sensor).  For my use, the lenses that I would choose for the D700 tend to be heavier than the lenses I would select for the D90, so weight plays a part in your selection of lenses too.

Nikon D90.  Image courtesy of Nikon.

Thirdly, after sizing up (and weighing) your camera and lenses, you'll need a way to carry it such that it is out of the way, and yet protected and readily accessible.  I like chest pouches and camera holsters.  Keep in mind that a crop-sensor camera like the D90 will fit into a smaller, trimmer chest pouch, while a D700 might require a more bulky holster.  If you're active, a heavy bulky bag gets more in the way than a lighter, trimmer one.

Here's how I would do it:
If I'm active, like if I'm hiking or climbing, I'll want a lighter camera that interferes with me as little as possible, and yet be easy and quick to access.  I might choose a D90 with a 16-85mm lens in a chest pouch, with a 10.5mm fisheye lens in a separate lens pouch.  I use the new Adobe Lightroom 3 to post process my images, and it has the ability to 'defish' my 10.5mm to make it look like an ultrawide lens, which extends the usability of this lens. 

If someone's paying me, or if the primary purpose of a trip is photography, and I'm not expected to be as active, I may have a standard photojournalist setup, such as a D700 with a 70-200mm f/2.8 and a D300 with a 12-24mm f/4 in a shoulder bag.

My advice?
Unless you already have your heart set on the full-frame D700, get the D90 first.  It will be easier on the pocket and easier to travel and work with.  If you find out that it doesn't suit your needs, you can upgrade to the D700, and still have a lightweight DSLR for more active pursuits.

... oh, and since there are rumors circulating that Nikon are about to replace the D90 (and maybe the D700) soon, it may be worthwhile waiting a little to see if the rumors are true :o)

Thursday, May 20, 2010

Training to Climb Mt. Everest

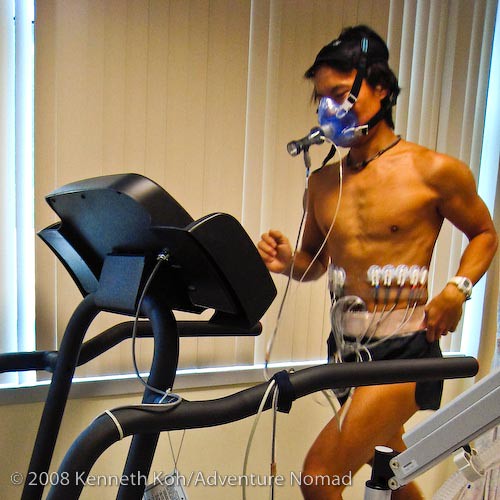
VO2 Max testing in 2008.  I did another one at the start of the year before I began training for Everest.

There's surprisingly little specific information available for training to climb the big Himalayan peaks, or high altitude mountains.  Searching the web yielded Ed Viesturs's training program.  I tried Ed's program of 4-days-on, 1-day-off (which means less than one day of rest in a typical training week), but I was pretty whacked out by the 4th day.  And then the 1-day-off wasn't enough recovery time, so I couldn't get the intensity up during the next 4-day-on cycle.  I've now settled into a 3-day-on, 1-day off cycle, and this has been working well for me.

I read as many books as I could find on the subject, including: Mark Twight's Extreme Alpinism, The Outdoor Athlete from Human Kinetics, and Clyde Soles's Climbing: Training for Peak Performance.  The one book which stands out, and that I continue to refer to, is Twight's Extreme Alpinism.  Although slightly outdated, it still contains much relevant information, and the principles of training, nutrition and equipment can still be applied.  Twight now owns and runs Gym Jones, a successful, if somewhat controversial gym, that trained the cast and crew of the movie '300'. Twight's Gym Jones website offers some of his updated philosophies on training and nutrition.

Twight and I seem to have read the same books.  Twight's nutrition advice agrees with Dr. Michael Colgan's groundbreaking 1993 book Optimum Sports Nutrition; and Colgan's strength training advice from The New Power Program: Protocols for Maximum Strength seems in line with Twight's (Twight now uses Crossfit training elements in his strength training protocol which I've also employed in mine).  Twight's advice for cardiovascular training is a departure from the norm in that he advocates intensive (interval) training before extensive (long endurance) in the macro training cycle.  If that sounds complicated, it is.  Go read the book ;o)

Core training.  Photo © Laura Liong

It's about a year til my Everest climb, and from Experience, I know I'll get burned out if I try to plan out a macro training program that allows me to achieve peak fitness once in a whole year.  So I've broken it down into two roughly 6-month long programs.  I plan to peak my fitness to climb Mt. Chola, China (6168m) in August, take a short break, and the train up again to peak fitness for the Mt. Everest climb in the Spring of 2011.