Adventure Nomad

Adventure Nomad

Friday, February 1, 2013

MotionX GPS vs. Gaia GPS

Ever since the iPhone came out with GPS, there have been GPS apps to take advantage of the GPS hardware built into the iPhone.  GPS apps like MotionX and Gaia are able to download and store free maps, so that they can used 'offline' - which means no costly data connection is required.

How does it work?  Your iPhone (3g and up) has basically three antennas:  The cellular antenna, where you get your phone calls and 3g data over a cellular network; the WiFi antenna, which connects to the internet for data from your home or WiFi hotspot; and the GPS antenna, which searches the skies for satellites and can pinpoint your position by triangulation.

It's free to use the GPS antenna on your iPhone, however, you need some maps on your iPhone to be able to make sense of the data.  You get those maps by preloading, or downloading the maps into your iPhone.  This is best done by WiFi, which is fast and (can be) free.  Be sure to turn off Mobile Data and Data Roaming when using these apps to prevent streaming live maps and additional costs.

Ok, on to the review.  Below is a head to head review on two popular GPS apps: MotionX GPS and Gaia GPS.

        MotionX GPS (v 20.0)                          Gaia GPS (v 7.2)
Gaia GPS navigation screen on iPhone 4s

MotionX navigation screen on iPhone 4s

I've been a long time user of MotionX GPS. At $0.99, it's a steal, however, your map download choices are limited to OpenStreetMap (OSM) and OpenCycleMap (which are OSM maps with terrain contours and bolder trail markings).  MotionX relabels these maps as MotionX Road and MotionX Terrain.  OSM maps are user developed, and require volunteer input to improve the maps.  OSM maps tend to be rather hit or miss, and it's hard to determine where they might hit or miss.  That's why I prefer a GPS app with other map choices.

UPDATE:
A reader has brought to my attention that MotionX GPS now offers downloadable maps from custom URLs, including USGS Maps for an additional $4.99. 

This is a MotionX screenshot of a section of the popular Annapurna Circuit trekking route in Nepal.  Here, OpenCycleMap is the best choice.
This is a Gaia GPS screenshot of part of Luang Prabang in Laos.  The purple line is a track I've created using RideWithGPS and downloaded to the Gaia GPS app.  The brown and blue square icons are POIs.  In Laos, Google Road Map was the best map choice for me. 
Gaia GPS costs $19.99, and offers a staggering number of downloadable maps, including OSM, OpenCycleMap, USGS Topo and Google Road maps.  The inclusion of USGS Topo and Google Road maps is a huge plus over MotionX.   If you're backpacking or biking in the backcountry anywhere in the USA, you will absolutely want the USGS Topo maps.  USGS paper maps are $15 each, so the app more than pays for itself if you need more than one USGS map!  For travels into third world countries, I've also found Google Road maps to be extremely useful as OSM data is often incomplete.  Gaia GPS is the only app I've found that has downloadable Google Road Maps.  Having the ability to preview a few maps and then download the best one that suits your needs is Gaia's strength.  See more examples below.

USGS Topo Map on Gaia GPS (full screen view mode).  I need the Colorado Trail which heads up north of Little Molas Lake.

 OpenCycleMap of the of the same area above.  Colorado Trail?  Err... What trail?

When I head out somewhere with a route in mind, I like to map it out.  I'll use software like MapMyRide or RideWithGPS to draw out a track, and then transfer the track to either MotionX or Gaia.  This track then shows up as a colored line on the map that you have downloaded onto your iphone, You can then monitor your progress on the track with your GPS position, which is indicated by the blue (MotionX) or orange (Gaia) arrowhead on the display.

Gaia GPS can display POIs (Points of Interest) which are downloadable, and are displayed on the map with a little clickable icon.  The name of the POI is available offline, and these are places of interest.  They could be your destination, or places to eat or sleep.  I find them useful when using street maps, like Google Road maps, or when planning.  I can click on a POI and leave it open while I scroll around the map.  The open POI allows me to find it again easily.  I find POIs clutter up the screen when using topo maps.  When you don't find POIs useful, you have the option choose which POIs to display or turn them entirely. 

For 99 cents, there's a lot of functionality built into MotionX.  You can monitor your heart rate (requires a compatible heart rate sensor), you can choose it's behavior for the app running in the background to save battery while monitoring your track.  As a result of all this functionality, the interface tends to look complicated.  Gaia GPS doesn't do heart rate, but otherwise most of the other functions, like tracking, are there, with a simpler user interface.

MotionX Search Screenshot
MotionX menu screenshot


Downloading maps in MotionX is a process of using a circular tool or elliptical tool to select the area you want to download.  The circular tool lets you draw a circle around an area, like a city.  To download the map for a planned track, you'll need to use the elliptical tool to draw out an area around your track, then select the scale (I use 1-16, which is the maximum for MotionX Terrain), then download it.  The process is painstaking in both effort required to use the tool and time required to download.  For a long track, like my upcoming bike tour of Vietnam and Laos, will take over a week of nightly downloads (I leave the download running all night because it takes hours).
Using the MotionX tool to download the map around a track.  You got to get this just right.  Too little, and you risk chopping off useful sections of map.  Too much and you'll spend time downloading excess data.


Downloading maps with Gaia is fast and easy.  For tracks, simply choose the track, then select 'Download Map for Track'.  Unlike MotionX, there is nothing to select.  Gaia GPS automatically downloads a five map tile width along the length of your track at maximum resolution.  Downloading the map of an area, like a city, is similar to MotionX.  You need to use a rectangular tool to select the area, select a scale, then download.  Download speeds are much faster than MotionX and typically takes me minutes instead of hours.
Gaia GPS downloading map around a track in progress.  No tools, just click 'download'. 
If I have any criticism of Gaia GPS, it's that the navigation screen is too cluttered.  Compare the two side-by-side screenshots at the top of the page.  MotionX makes better use of screen space.  Screen navigation buttons are pop-up and disappear after a couple of seconds.  Touch the screen anywhere to make those buttons pop-up.  Touch the double arrow icon on the right of the screen to make the menu buttons appear.  Gaia's screen is a little more cluttered.  The only way to make the menu bar disappear is to turn your iphone sideways, which then gives you a full screen view.  If you cannot rotate your iphone (eg, if your iphone is in holder on your bike handlebar), or you simply prefer to hold your iphone upright, then there's no way to make the menu at the bottom of the screen disappear, and it's taking up valuable screen space.  Also, note the arrows at the bottom left, and top left and right of the screen.  The top buttons slide out the search function and menu.  The two bottom buttons are user configurable.  Nice, but those buttons can get in the way when scrolling the map.

Note that Gaia GPS is a universal app designed for both iPad and iPhone, and is also available for Android.  MotionX is an iPhone app.  The iPad version, MotionX HD, is available for $1.99.

 Conclusion
For adventure and travel, I'd go with Gaia GPS.  The additional maps on Gaia GPS gives users a lot more versatility and accuracy; plus the ease and speed of map downloads over MotionX wins me over.  

Thursday, January 24, 2013

EVEREST: Realizing The Dream

I'll be giving a talk on "How to Climb Mt. Everest" to the National University of Singapore Mountaineering Club on Monday 4th February at 7pm at the SRC (Sports and Recreation Club) Conference Room at the National University of Singapore (click the link for a map).  The talk is open to the public and all are welcome.


View SRC Conference Room in a larger map
 
The presentation will last about two hours and is really a compilation of all the "tips" I've gathered to make it to the top.  These tips include finding sponsorship, experience building, training, equipment, choosing between climbing from the South or the North, and using Diamox and other supplements.

Although I've been climbing on and off for over 30 years, I'm by no means an expert, so these "tips and tricks" are from a wide range of sources that I'd thank:

Lim Kim Boon, Singapore's only mountaineering guide, my old friend and climbing partner;
Jamie McGuinness (Project Himalaya), experienced, intelligent, super-nice guy;
Lien Choon Loong, who climbed Everest the year before me and whose tip on 'sprinting' completely revamped my training method;
Brian Oestrike, from Hypoxico High Altitude Training Systems;
The SWET girls, especially Joanne Soo;
Mark Twight (Gym Jones) for his training guide Extreme Alpinism: Climbing Light, Fast, and High and for leading me to Crossfit;
David Lim, from the First Singapore Mt. Everest Expedition; and
Jamling Bhote, my Sherpa, my friend.

What I learned from these sources was an immense help to my successful climb up Everest, and now, it's my turn to pay back and share what I've learned.  If you've got dreams to climb Everest someday, I hope you can make it down on Monday, 4th February at 7pm to the SRC Conference Room at NUS.

Wednesday, January 9, 2013

Phuket Bike Touring

Setting off a lantern on New Year's Eve at Nai Yang Beach, Phuket, Thailand.

Phuket, jewel of Thailand, turns out to be a great launching point for a cycle tour.  While the south of Phuket is awash with tourist traps and tourists, the north is relatively uncrowded.  We started our tour from Nai Yang Beach, which is just a few kilometers south of the airport.  We would suggest you arrange a hotel pick-up and drop-off if you are traveling with your bikes.  Arriving at night on New Year's Eve, we had to make some private arrangement to get ourselves and bikes over to my cousin's house, where we stayed.

The first day from Nai Yang to Khao Lak is about 95km, flat with some rolling terrain at the end.  It's about half on backroads and half on highway.  The backroads are narrow, but traffic is very light.  The traffic on the highway is moderate, but traveling very fast.  However,  there is a 2 meter wide shoulder on highways for cyclists and motorcycles which we stayed comfortably on.

We spent the first night at the Nang Thong Bay Resort.  Highly recommended.  Get a garden view bungalow.  Ours was set just one back from the beach.  If you can afford it, the beach front ones guarantee you an unobstructed view of the sea.  Just a short walk up from the resort into town is a small temple, and next to it is a little massage place that is also highly recommended.  We had dinner at the highly rated Sala Thai Restaurant.  The food was good, but we waited over an hour for food.  Seems normal.  I say either go early, be prepared to wait, or go elsewhere.

Sunset at Nang Thong Beach, Khao Lak.  What a view!  My wife took this shot with her iPhone 5 from just a few meters outside from our Garden Bungalow.

When in Thailand outside the tourist areas, you've got learn to speak a few words of Thai.  Here are some useful phrases:

My Pet - Not too spicy
My One - Not too sweet
Hong Nam - Toilet
Check Bin - Check Please!

Leaving Khao Lak, we proceeded North up the highway for a short bit, then a right turn took us along uncrowded backroads.  Total distance is just 75km, but with a hill at the end.  I used RideWithGPS (click the link to retrieve the GPX files) to plan the ride and upload the course onto my Garmin Edge 800.  The Garmin was new, and I'd never used an uploaded course before, so I had brought my iPad and iPhone as backup GPSs.  That was way too heavy.  See below for lessons learned.

The jungles of Khao Sok was a big change from the beaches of Khao Lak.  I can't really recommend the place we stayed at, but found the tree houses of Our Jungle House enchanting and worth recommending.  They are a bit out of the way, and they don't have hot water or air-conditioning at the the tree houses.  If you can live with those limitations, that would be the place I'd recommend.  We ate at a few restaurants, and found the highly rated Thai Herb Restaurant good but with small portions and not good value.  The restaurant at Our Jungle House turned out to be better value with big portions and good food.

Our Jungle House accommodation at Khao Sok.  Enchanting, but no hot water or air-conditioning.

We had planned a 'rest day' in Khao Sok and decided to spend it biking in the park.  Big mistake.  Turned out to be a pretty strenuous hike-a-bike (see video), and not much to see.  If I were to to it again, I'd arrange with a hotel in Khao Sok to store my bike on arrival, then take me out to Cheow Larn lake and spend the first night in a raft house on the lake.  I'd spend my rest day doing the lake tour, and then arrive back in Khao Sok the next day and spend it at one of the tree house resorts.

The 116km from Khao Sok to Phangna turns out to be a really scenic road ride.  We started the first 7km on dirt, which you can avoid if you don't have a mountain bike.  Phangna is not a tourist town.  We stayed at a small inn, and then biked the last 70km back to Phuket the next day.  If you had car support, you could chuck your bike into the car and skip the last day's ride back into Phuket.

All in all, a pretty short and easy bike tour with a good variety of scenery and riding.  If I had to recommend a novice bike tour in South East Asia, this would be it.


Phuket Bike Tour from Adventure Nomad on Vimeo.

Lessons Learned:
One of the useful things about taking a short easy tour is that mistakes made are only painful for a short time.  My next tour is longer (Laos in February), I'll only be using my iPhone for navigation, with back up power via an external battery.  That will save me quite a bit of weight.  I won't be bringing my Olympus OMD EM5 either.  It turns out to be too heavy, and I hardly used it as I shoot more video with the Gopro while on the bike.  I'll be bringing my new Panasonic LX7 instead.  It turns out I can save a little more weight by only using one jersey and wash it while I shower, as it will dry the next day.  On thing we did right was using Revelate Designs bags.  They turned out to be spot on for any kind of minimal weight and gear tour. 

Sunday, December 30, 2012

Great Deal on The Panasonic LX7

I wrote not too long ago about the Panasonic Lumix LX7, and I've been waiting to buy mine.  Well, it looks like now is the best time to get one.  For whatever reason, the price has taken a huge drop.  Perhaps the market has decided that it prefers the larger sensor of the Sony RX100 and the LX7s are overstocked.  Whatever the reason is, I'm taking advantage and getting one now.

Get your Panasonic LUMIX LX7 at US$299 from Amazon now!


* If you're in Singapore (like me), street price for the LX7 is S$599.  There's a rebate offer for a free battery and a SG$50 NTUC voucher from authorized Lumix dealers until January 13th.  Not quite as good as the US deal, but it works for me ;)

Saturday, December 29, 2012

Not Just Another Fatbike

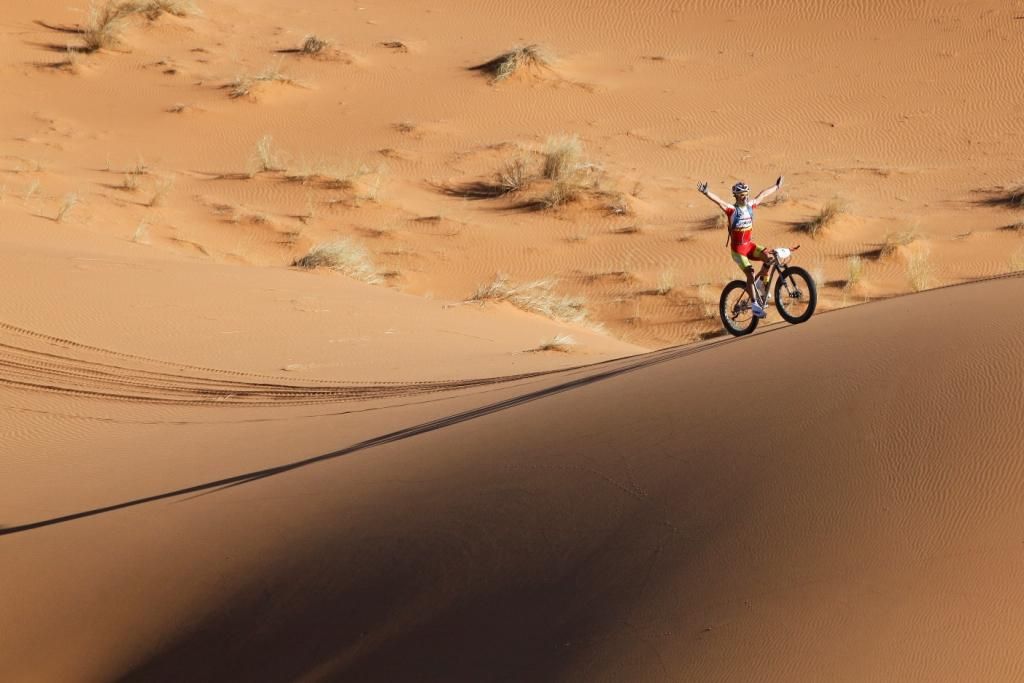
Milton Ramos leading the pack with his Sandman Hoggar Ti in the Titan Desert. Photo courtesy of Sandman Bikes.

Fatbikes have always been interesting to me.  Originally designed to be ridden on snow, Fatbikes have evolved to be simple, rugged bikes that you can ride just about anywhere (well, more rideable that a skinny-tired bike anyway).  The fat, 4" wide tires eat up roots, loose ground, rocks, sand and snow.  As a bonus, the wider tires apparently do less trail damage than skinnier tires.  Fat tires offer unmatched grip for steep climbs and descents and have some 'suspension' benefits as well.

The major down side with fat bikes is the weight.  Fatbikes weighing well over 30 lbs is the norm.  The fat tires can be draggy as hell, and the bikes can have sluggish steering characteristics.

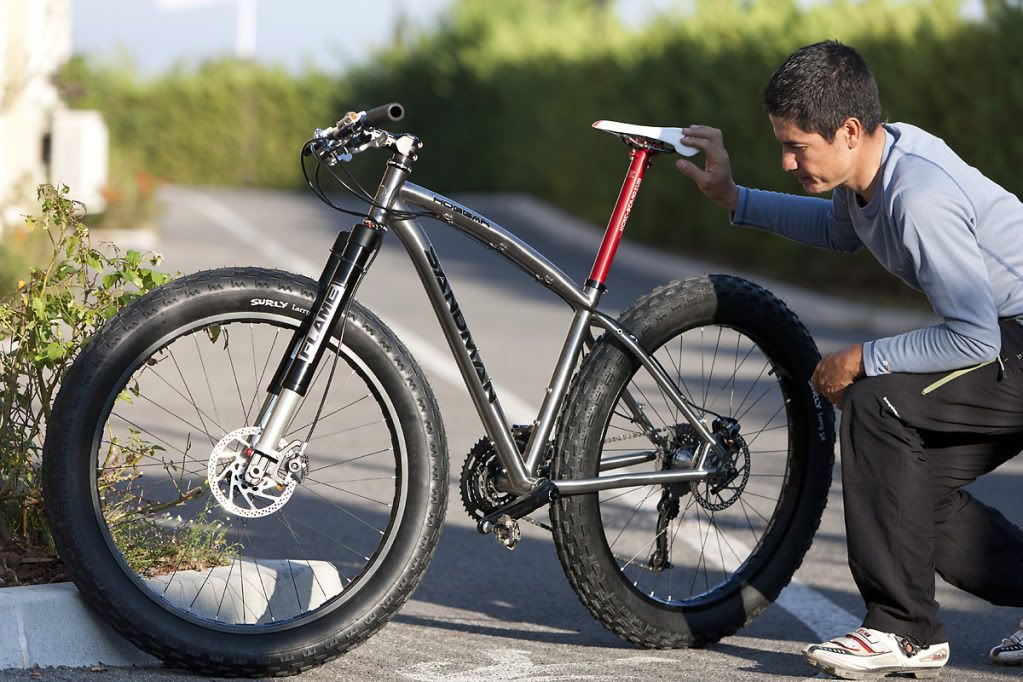
At least one Fatbike manufacturer has taken a taken a different approach.  Sandman Bikes were designed from the ground up to be trail bikes, not snow bikes.  How's it different?  Other than the top models being specced with front suspension, I can't really say.  There is scant information available on their website, only just enough to find your size and order a bike. 

Milton Ramos and his Sandman Hoggar Ti.  Image courtesy of Sandman Bikes.
The proof is in the riding, and if I can't get to ride it, I'd like to hear from someone who has, or better yet, have some performance results.  What's encouraging is that the Belgium based Sandman has a sponsored rider, Milton Ramos, who has done quite well riding the company's top-end Hoggar Ti model, albeit using a combination of fat tires and 29er wheels.  Milton Ramos has managed to get the weight of his Hoggar Ti down to 12.5kg with fat tires, and under 10kg with 29er wheels.  Quite a respectable weight, plus the fact that he is riding the bike well says a lot about its handling qualities.

Quite frankly, I'm unlikely to give up my S-Works Epic to race the Hoggar, but it's a different kind of ride, and I'd really like to get my hands on one!

To give you an idea on what this bike is for, here are a couple of excellent videos by Martin Campoy, riding his Hoggar Ti in Nepal: