
This is Part III in a series of articles to help travel and adventure photographers bring home better images.
I was a die-hard JPEG shooter when I wrote this article 'Optimize Your Camera Settings'. At the time, I thought shooting RAW was complicated and I wanted to keep things simple by shooting JPEG, and letting the camera 'process' my shots for me. Pro Mountain Biking photographer, and fellow blogger, Seb Rogers, talked me into giving RAW a shot. I'll be frank: It was a struggle, with a steep learning curve. But, if I knew then what I know now, it might have been a lot easier.
The Problem with JPEG...
For a travel and adventure shooter needs to work fast, and usually gets only one chance to make a shot, the two biggest reasons to shoot RAW are:
1. Adjustable White Balance
Loosely speaking, white balance is the color temperature of the scene. In tungsten lighting, it is warm, and JPEG shooters walking indoors will have to change the White Balance setting on their cameras from Daylight to Tungsten, in order to avoid overly orange looking images. If you forget to change the white balance when walking back outside, you'll end up with bluish images. The JPEG White Balance AUTO setting usually does a fine job in DAYLIGHT, but struggles in unusual lighting, like tungsten or underwater. With RAW, I simply leave it in AUTO, and adjust it back home on my computer if required, when I have plenty of time, and no pressure.
2. Greater Dynamic Range
Correctly speaking, this should read greater exposure latitude. What I'm getting at is that with post-processing in RAW, you can recover a greater range of tonal details, from dark shadows and washed out skies. Even with a properly exposed shot, a JPEG shooter, who has less exposure latitude, may end up with washed out skies that he cannot recover.
Those two reasons should be enough for any adventure/travel shooter to switch from JPEG to RAW. If you're not convinced, here's the kicker:
RAW is SIMPLE
The problem with JPEG is that once you've clicked the shutter, and the image is made, there is very little leeway to change whatever is wrong with it. This means that you have got to get it right in-camera. To maximize my chances of getting it 'right' when I shot JPEG, I used to spend quite a bit of time with each new camera adjusting and testing each parameter (Exposure, Saturation, Contrast, Sharpness, etc) in order to optimize it's settings.
Shooting RAW, I still need to test out the camera, but now I usually only test for Exposure.
It's in the Software
The key to keeping it simple is in the software. I use Adobe Lightroom 3 . To me, it's like Apple's iPhoto on steroids. It's an organizer, library, image editor and slideshow creator. The real strength of Lightroom is in it's Develop (editing) module. I can't remember the last time I used Photoshop, as Lightroom does enough for me.
Step one to using Lightroom 3 is to get some education, and probably the best reference book is Scott kelby's Adobe Photoshop Lightroom 3 for Digital Photographers .
.
Step two is to set up an Import Preset, so that when you import your images from your camera, all the settings you want done are automatically done for you. The trick is to figure out what settings you would like made on ALL your images. I like bright, punchy images, so I use these settings with my Nikon D300:
Presence:
Clarity 35
Vibrance 35
Saturation 0
Tone Curve:
Medium
Sharpening:
Amount 50
Detail 50
Masking 50
These settings work for the 90% of images that live on my hard drive. For the 10% of images that I deem worthwhile, I'll also work on the white balance, tones, dust removal (if required), etc.
The beauty about working RAW files in Lightroom is that image editing is non-destructive. That means that you can play around with these settings while you're learning, and if a few months later, your skills improve and you decide you want to rework those images, they are all there for you.
Next:
Part IV: Advanced Tips
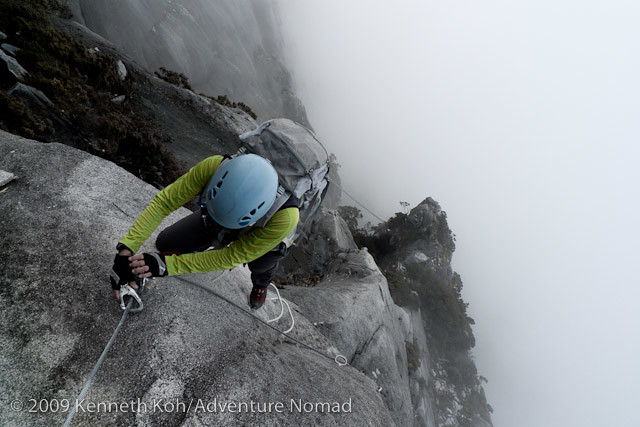 |
| Low's Peak Via Ferrata, Malaysian Borneo. I applied a desaturation effect in Lightroom to maintain the simple clean lines in the image. |
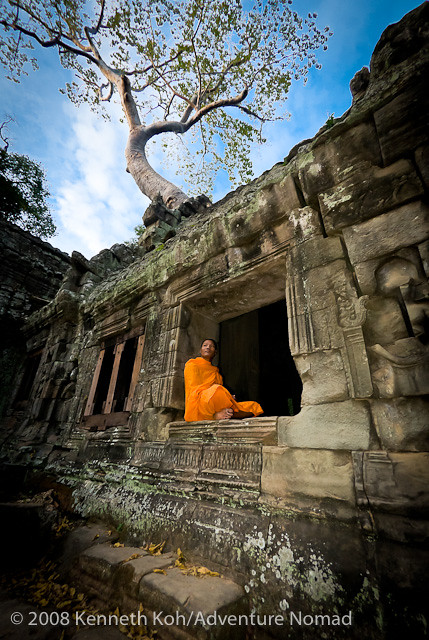 |
| Monk at Ta Prohm, Cambodia. This is one shot that would not have been possible with JPEG. The monk is sitting in shadow, but I was able to bring back some detail in his face with some creative work using Adobe Lightroom. |
The Problem with JPEG...
For a travel and adventure shooter needs to work fast, and usually gets only one chance to make a shot, the two biggest reasons to shoot RAW are:
1. Adjustable White Balance
Loosely speaking, white balance is the color temperature of the scene. In tungsten lighting, it is warm, and JPEG shooters walking indoors will have to change the White Balance setting on their cameras from Daylight to Tungsten, in order to avoid overly orange looking images. If you forget to change the white balance when walking back outside, you'll end up with bluish images. The JPEG White Balance AUTO setting usually does a fine job in DAYLIGHT, but struggles in unusual lighting, like tungsten or underwater. With RAW, I simply leave it in AUTO, and adjust it back home on my computer if required, when I have plenty of time, and no pressure.
2. Greater Dynamic Range
Correctly speaking, this should read greater exposure latitude. What I'm getting at is that with post-processing in RAW, you can recover a greater range of tonal details, from dark shadows and washed out skies. Even with a properly exposed shot, a JPEG shooter, who has less exposure latitude, may end up with washed out skies that he cannot recover.
 |
| Climbing Mt. Rinjani, an active volcano in Indonesia. Highlights in the sky at sunrise are retained in the RAW image. |
RAW is SIMPLE
The problem with JPEG is that once you've clicked the shutter, and the image is made, there is very little leeway to change whatever is wrong with it. This means that you have got to get it right in-camera. To maximize my chances of getting it 'right' when I shot JPEG, I used to spend quite a bit of time with each new camera adjusting and testing each parameter (Exposure, Saturation, Contrast, Sharpness, etc) in order to optimize it's settings.
Shooting RAW, I still need to test out the camera, but now I usually only test for Exposure.
It's in the Software
The key to keeping it simple is in the software. I use Adobe Lightroom 3
Step one to using Lightroom 3 is to get some education, and probably the best reference book is Scott kelby's Adobe Photoshop Lightroom 3 for Digital Photographers
 |
| Goatherd and son, India. Nikon D300, 50 F/1.4G. Standard Import Preset settings applied in lightroom. |
Presence:
Clarity 35
Vibrance 35
Saturation 0
Tone Curve:
Medium
Sharpening:
Amount 50
Detail 50
Masking 50
These settings work for the 90% of images that live on my hard drive. For the 10% of images that I deem worthwhile, I'll also work on the white balance, tones, dust removal (if required), etc.
The beauty about working RAW files in Lightroom is that image editing is non-destructive. That means that you can play around with these settings while you're learning, and if a few months later, your skills improve and you decide you want to rework those images, they are all there for you.
Next:
Part IV: Advanced Tips
No comments:
Post a Comment