Adventure Nomad

Adventure Nomad
Showing posts with label Reviews. Show all posts

Friday, October 12, 2018

Lightweight Adventure Photography


_DSC0847
Unlike ‘Painter’, who carried 5 1/2 lbs of oils, brushes and canvases and a home-made easel on his thru-hike, a photographer’s tools are much simpler.  Sony RX100 V, 24mm equiv., f/1.8, 1/640 sec, ISO 125


Being able to bring back breathtaking images from a lightweight adventure trip, such as a thru-hike, are really part of the purpose of the trip for me.  But when the need to go ultra-lightweight conflict with the need to bring a camera, some decisions need to be made to keep the weight down, and the quality up.  Here’s the gear I used for my PCT thru-hike, my thoughts and process:
The Gear
For ultralight adventures, I have a preference for compact cameras with 1″ sensors, like those made by Canon, Panasonic and Sony.  I carried one of those to the summit of Everest, and are what I chose for my PCT thru-hike.  For me, they are the lightest weight, rugged enough, high quality option for a trip where minimum weight is a priority.

IMG_0992
The Approach to Mt. Whitney, handheld in low light.  Sony RX100 V, 24mm equiv., f/1.8, 1/60 sec, ISO 2500,

For my thru-hike, I used a Sony RX100 Mark IV and Mark V.  I damaged the monitor on my Mark IV in the desert, and my wife brought me a new Mark V to Kennedy Meadows, which I used (more carefully) til the end of the trip.  The Mark III, IV and V have similar focal length zoom rang: 24-70mm, so if you are trying to save some money, going down the evolution tree might suit you.  The 24-70mm zoom range is great for ‘people’ shots, but if I were to thru-hike the PCT again though, I would take the newest Sony RX100 Mark VI, which has a 24-200mm zoom range.  The additional telephoto range is useful for wildlife, but sacrifices a bit of aperture to do it, so it isn’t as good in low light, and will have a bit more image noise overall.  Also, it costs more than the other cameras.

IMG_1004
Cooling off in the Feather River.  Getting it all in with the Moment Superfish lens on my iPhone 7+

I also used my iPhone 7 plus with the Moment Superfish lens* to complement my Sony RX100 for a wider (fisheye) focal length perspective.  Why not use my iPhone for all my shots?  For me, the main deal breaker is that it doesn’t do so well in low light.  They are also cumbersome to operate, especially if you want manual settings.  My iPhone camera makes a good supplement to my compact camera for options, like a Fisheyeultra-wide or Macro lenses, but as a main camera, they are not quite there yet for me.
*Note: Use of Moment Lenses requires the Moment Case.

_DSC6008-2
Sony RX100 V on the Ultrapod, 10 second self-timer, 24mm, f/8 for depth of field and sunstar, 1/60 sec, ISO 125

I used a lightweight Pedco Ultrapod mini-tripod, which I left attached to the camera most of the time, mainly for selfies, like those you see in these shots and in the video below.  You have to be creative with setting it up: You can set it up on the ground, on a rock, strapped to your trekking pole, tree branch or post.  The whole setup fits in a ZPacks Shoulder Pouch attached to the shoulder strap of my backpack for quick access.  For selfies, I used the 10 second self-timer on the camera to allow me enough time to get into position, then fired off a burst of 3 or 5 shots.  There is also an option on the RX100 to use your smartphone as a remote, which I used once for a night shot.
For my iPhone, I had a Joby Griptight One, which I bought together with the Micro Stand.  That could be a great option if you just wanted to use your phone camera for the thru-hike.  I took the stand off and just used the Griptight part to attach my phone to the Ultrapod.  I have the ProCamera App on my iPhone, to shoot RAW and for the extended self-timer.   I also carried a bluetooth remote shutter release for the iphone which I used only once.
In The Field
I tend to do most of my photography in the early morning.  The light is great, I feel fresh,  and I have the whole day ahead of me with no pressure to reach a campsite for the night.

Processed With Darkroom
I wanted to create a shot of the One Mile marker with a blurred hiker walking past.  I tried out different shutter speeds, and this one worked out best. Sony RX100 IV, 24mm, 1/6 sec, f/11, ISO 200


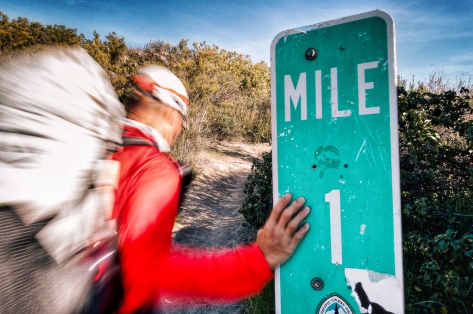
I shoot mostly in Aperture Priority Mode.  I’ll choose something like f/1.8 for shallower depth of field or perhaps f/11 to create a sunstar if I’m shooting into the sun.  Occasionally,  I’ll shoot in Shutter Priority Mode to create some motion blur, as in the photo above.  Shooting in one of these semi-automatic modes frees me to make one creative decision, either the aperture or shutter speed, while letting the camera work out the the rest, like the ISO.  I will put the camera in Program Mode if my brain is fully occupied with other tasks or I need to focus, like when climbing Everest and low on oxygen.  I rarely shoot fully Manual, but will do it if it’s something the camera cannot handle, like night shots.
My Sony RX100 camera charges directly with a USB cable, so in the evening, it’s a simple matter to just plug in my camera into the power bank for charging.  I had a Suntactics S5 Solar Charger, and found it very useful in the desert and the Sierras, but not for NorCal, Oregon and Washington, where I replaced the solar charger with a Qualcomm quick charger for quick town stops.
Post-Process
When I have a zero (rest) day, I’ll transfer selected images from my camera to my phone for editing, posting to social media and for backup to the cloud.  I used to carry an Apple SD Card to Lightning Adapter, which would allow me to transfer the RAW images, but found that too much of a hassle, so I just used the built-in Sony App to wirelessly transfer a small JPG file from my camera to the phone.  These were good enough for Instagram, but not for viewing on a large monitor or for printing. However, If you shoot JPG, the camera will transfer a large JPG file to the phone.  I used Adobe Lightroom CC (paid) and Snapseed (free) on my phone to edit and post the images.  Not everyone likes my editing style, but if you are interested to replicate the look, here’s a quick and easy Snapseed editing tutorial on how I do it.   The images you see in the video linked below have all been reworked from the original RAW files for viewing on large monitors.


This seems a lot of effort, and it is, but I love sharing the experiences I’ve had with others, and having powerful images that make an impact are worth it me.

Thursday, May 26, 2016

Simply Awesome: The North Face Waterproof Lumbar

I've been looking for a way to carry my oversized iPhone 6+ for the times when I'm out and about, and keep it dry from sweat and sudden rain storms.  Here in humid, tropical Singapore, both are a real problem.  When I added the Sony RX100 pocket camera to my assortment of carry around items, I knew I had to find a solution.

Laura models The North Face Waterproof Lumbar - Medium
Enter the North Waterproof Lumbar Pack.  It is a 4 liter (244 cubic inch) capacity, roll-top lumbar pack with fully taped seams.  When I first saw this, I thought it looked gimmicky and could not be waterproof.  Well, I took it home and held it under water for 30 seconds, and it did not leak.  The pack also has three external pockets that aren't waterproof, that are useful for things like keys or snacks, but everything you need to keep dry has to go in the main compartment.


It has become my 'man-purse' of sorts.  All my electronics and valuables, like pocket camera, cell phone, wallet, iphone lenses, spare batteries and memory cards, sunglasses earphones, and lens cleaner go in the main compartment.  Keys (if your car key has an electronic remote, it needs to go into the mail compartment), lip balm, and other small items I don't need to keep dry, go in the outside pockets.  In daily use, I tend to just clip the two ends of the roll-top together like a regular dry bag.  It works to keep the bag waterproof, and is quicker to open and close, since I only make one clip, but does not look as neat as clipping the two ends and cinching it down the sides of the pack.

What is also cool is that you can separate the waterproof bag from the hip belt, and you could use that like a regular small dry bag.  It will hold more than the items shown above, but keep in mind that the capacity is only 4 liters.  On my scale, the whole thing weighs 249g, and the separated dry bag weighs 104g, so a pretty lightweight setup.

The roll-top dry bag can be separated from the hip belt
It keeps my valuables and electronics dry, and safely secured around my waist.  It's the best outdoor 'man purse' I've ever used... Period.  'Nuff said.

The North Face Waterproof Lumbar is currently available at The North Face Singapore Stores.  

Disclosure:  I am sponsored by The North Face Singapore.  As such, I get gear from The North Face at no cost to me, or at a discounted price.  The item reviewed above was requested for my own personal use.  I just like it so much, that I felt I had to share it with you.

Wednesday, May 4, 2016

Penny Board vs. Oxelo Yamba

I wanted a small skateboard for transport and a little bit of fun.  I'm new to skateboarding and didn't want to pay too much, in case I found that it wasn't for me.  I borrowed my niece's 2-year-old Penny Board, and after a while, decided that pink wasn't really my colour, so I bought an Oxelo Yamba from Decathlon, which is a Penny knockoff.

Top: Oxelo Yamba; Bottom: Penny 22"
From the outside, there didn't appear to be much difference.  They are both roughly the same length, 22", although the Yamba is a little shorter, as you can see in the image above.  The Penny weighs 1920g and the Yamba weighs slightly more at 1980g.

Orange Yamba Wheel left; Green Penny Wheel right
They both use the same ABEC 7 bearings, but the Penny cruised far longer than the Yamba.  When I spun up the wheels, the 2-year-old Penny bearings spun for longer.  Since my niece got a new Penny and didn't want the old one anymore, I took the old Penny bearings and installed them on the Yamba.  When I spin up the wheels, the transfered Penny bearings on the Yamba spin for longer, but strangely, when I ride the boards, they both now go about the same distance, so something else is going on that works in the Penny's favor, and I suspect it may be the wheels.  Read on...

Yamba Hardware, 20g
Penny Hardware, 15g


Quality wise, the Penny seems better made all around.  Penny's wheels have an inserted hard plastic cup where the bearings go, and the Yamba's wheel is just molded rubber.  The cushions/bushings are taller on the Penny, and the mounting hardware (bolts, nuts, washers) weighs a little less on the Penny.

2-Year-Old Penny cushions left; Brand New Yamba bushings right
Performance wise is where is starts to get interesting.  The biggest difference is in the deck.  While they both flex, the Penny holds its rigidity better in the middle.  I weigh 65kgs, and the Yamba sags under my weight.  While I got used to it, if you are new and hop on the board, the sag is just one more movement variable you need to compensate for in addition to the forward movement, and side-to-side roll.  I also prefer the grippier waffle pattern on the top deck of the Penny compared to the smoother, wave pattern on the Yamba.

Penny left; Yamba right

The wheelbase on the Yamba is a little longer, and I found that it is not as maneuverable as the Penny.  The Yamba tends to understeer, the Penny turns just where I want it to go.  The upside is that because I put my feet on top of the trucks, the longer wheelbase actually gives my feet more room on the deck.

The Penny turns better, rolls better, and because of the more rigid deck, feels more stable too.  Bottom line is that I prefer the Penny.  The Penny costs twice as much as the Yamba though, and if you are lighter weight rider, or are riding to get to someplace as opposed to riding for fun, the Yamba can be good value.  If you can afford it though, go for the Penny.

Amazon usually has the best prices for Penny Boards.
Oxelo Yamba boards are available from Decathlon.com


Sunday, April 3, 2016

Best GPS Apps Of 2016

Armed with GPS chips, mobile phones have become increasing powerful, and prices of such devices have fallen to levels within reach of many.  The larger screen and ability to quickly and easily update apps and maps, make them a viable replacement for dedicated GPS devices in many cases.  There are some caveats to using your phone for navigation, such as making sure you don't run out of power, and having a back-up, such as carrying paper maps or another mobile phone.  Read more here.

There is no one single best app for navigation.  Different apps have different strengths, different areas of coverage, eg. urban vs. backcountry.  In no particular order, here are the GPS apps on my iPhone and my picks for the best GPS Apps of 2016:

1.  Google Maps (Free)
Like it or not, Google is one of the best apps for GPS.  It is extremely powerful with excellent maps, including some offroad trails, a searchable data base, real-time traffic information, and turn-by-turn navigation for driving, walking/biking, and public transportation.  It requires data for use, and it is my default app at home where I have a data plan.  You can store a small portion of a map, like a city, for offline use, but that doesn't work for me, and so I don't use this app when I travel.

2.  Here Maps (Free)
Here Maps was originally developed by Nokia and is now owned by three German automotive companies - Audi, BMW and Daimler-Benz,  Map presentation is not as slick as Google Maps, but both app functions similarly.  The big difference is that it can do it Offline - meaning it does not require online data to function.  To have offline navigation capability, you will need to download the map of the country (not all countries are supported) and store that on your phone.  Once the map is downloaded, you will have a searchable data base, turn-by-turn navigation for driving, pedestrian, and public transportation.  You can also get real-time traffic information by choosing to use the app online.  Here uses its own maps, so it may be better or worse than Google, depending on where you are.

3. Maps.Me (Free)
If there is a no-brainer navigation app to download, it's Maps.Me.  For an offline GPS app with a searchable database, it's extremely responsive, fast to load app with a very small footprint.  Just to give you an idea of how remarkably compact the map data file size is, Singapore on Here Maps is a 112MB download, while it's just a 7MB on Maps.Me.  It also claims to cover every country in the world.  It uses the open source OpenStreetMaps data, which can be either good or bad, depending on contributors to the mapping database. Often, I'm able to search out locations like a small hotel or coffeeshop that cannot be found on Here Maps.  Other times, it misses completely where Here or Google Maps will find it. It offers turn-by-turn voice instructions can be enabled for driving and walking/biking, but no option for public transportation like Google or Here.  The map presentation looks quite nice, and various points of interests and landmarks pop up as you increase the scale, which is great for travellers on foot or bike to orientate themselves while moving around a city.  It's strength is being able to search out and find things that travellers would be interested in - parks, trails, coffeeshops, hotels, etc.  For my use, it has replaced Maplets on my iPhone.  I have not noticed any battery drain for Maps.Me, but I do notice that Maps.Me selects the GPS so it is always on, regardless of whether you are using the app or not. 


4. Gaia GPS (Paid)
For backcountry navigation, Gaia GPS remains my app of choice.  The availability of USGS Topo Maps for the USA and a host of other downloadable wilderness maps, and features such as being able to create a route manually on the iPhone itself, and power saving features make it a clear winner.  Gaia GPS can be used offline, and in addition, also selected for use in 'Flight Mode', which means the phone is off.  In the backcountry, this is a good thing, since it is unlikely that there is a phone signal, and your phone isn't left searching for a signal.  Note that the search function is poor, and it doesn't do turn-by-turn navigation, so it's not a GPS app for urban use.  For a write-up on navigating with Gaia GPS on your iPhone, read this.

Saturday, November 7, 2015

Testing The Sony A7S MkII For Adventure Filmmaking

In a previous blog post, I wrote about how the Sony A7S II might be the ultimate adventure filmmaker's camera and about how it might be a replacement for my Panasonic GH4.  I went ahead and bought an A7sii from Sony, and a used Zeiss 24-70mm f/4 lens, and that's what I used for the video below.

I took it to the climbing wall, and used it the way I would be using it outdoors, to see if I liked the way it handled. I climbed with it, anchored myself to a bolt and shot the climber below me.  I liked how I could turn the camera on with one hand (very Nikonesque), and the grip, although short, was sufficient.  The setup, with the Zeiss 24-70, although not light, was well balanced, and the 5-Axis Stabilization worked very well.  All in all, it worked out well for me. Check out the test video below:


Adventure Testing Sony A7SII: A Day At The Climbing Gym from Kenneth Koh on Vimeo.
Password to view: 'nomad'

I shot this video as a quick test to see if the Sony A7s Mkii would work for me as an adventure filmmaking camera.  Meaning if I could get used to the handling of the camera, and if if I could get it to work with the way I shoot, and get the results I wanted.  I wanted some creative control, but not be overburdened, and so I chose to control only the aperture, and left White Balance, Shutter Speed, ISO and (mostly) Autofocus in Auto.   Everything was recorded at 4k resolution, 24fps, and the aperture was left wide open at f/4.  I used the Autumn Leaves Creative Style in camera with the saturation and sharpening turned all the way down, the Dynamic Range Optimizer set to 4, and white balance set to Auto.  The light in the gym was a mix of sunlight filtered through the skylight, and florescent light. All shots were hand-held (except for the title clip where I used a slider), with a little stabilisation (Coremelt Lock and Load) applied in post on about half the clips.  Editing was done on FCPX, with some color balancing, contrast, grain and a vignette added in some shots.  Voice over was recorded on location, using a Audio Technica ATR3350 lavalier mic plugged directly into the camera.  The whole thing was shot in about 2 hours, and the edit took about a day.

Here's what I liked about the A7sii:
  • What I found most useful was the 5-axis stabilisation on the camera.  I had that on the Olympus OMD EM5, and missed that feature sorely when I sold the camera to buy the GH4.  
  • Video Autofocus - It can be a bit slow for faster moving subjects, but it's surprisingly useable. 
  • ISO freedom.  It was a bit dark in the subway station, but ISO wasn't even a concern. 
  • Internal 4k, but I already had that with my GH4.
Here's what I didn't like:
  • Ergonomics and the Menu System could be better... but then you already knew that ;)
  • Mine's a PAL model, and I need to set it to NTSC to shoot 24p and 120p.  Every time I turn on the camera, I get a warning that the camera is in NTSC mode.  There is no way to disable or turn off this warning.  Seriously?  Every time?  Don't you think once would be enough?
  • No way to set up a custom button to shoot in APSC Crop Mode.  I've set up one of the Memory Recall settings on the Mode Dial to shoot 120fps, which also puts me in APSC Crop mode, but that activates Program Mode and I have no control over aperture or shutter speed.
I've only had the camera for a week, so I've got a lot more learning to do.  I want to play around with some of the other color profiles, and I need to buy and test out the Time Lapse App.  One other big unknown for me is how the small Sony batteries perform in extreme cold.  

Will I be replacing the GH4 with the A7sii?  I think so, although it was closer than I thought.  I really liked the 5-Axis Stabilization, which comes in very useful for a one-man, run and gun type shooting.  Video Autofocus has difficulty with subjects moving too quickly to and away from the camera, but is otherwise very useful.  The image quality is very nice, both at 4k and in the APSC Crop at 120fps, with an organic feel and nice subject separation.  My main issue is with the weight.  In order to keep the weight reasonable, I've chosen to replace my M4/3 standard 3 lens setup with focal lengths that range from a full-frame equivalent 14-280mm for a single 24-70mm f/4 zoom.  In doing so, I'll lose a lot of focal length range, but that's the tradeoff for the features on the Sony I think are worth having. 

Monday, September 21, 2015

Sony A7s II: Is This The Ultimate Adventure Filmmaker's Camera?

A travel and adventure camera should be lightweight, rugged, and simple to use while offering good image quality.  Last week, Sony announced the Mark II version of it's legendary low light camera, the A7s II.  Here are my thoughts as to why I'm considering this as a replacement for my Panasonic GH4 in 2016, and maybe why you should be considering this camera too.
Sony A7s II
When I got my Panasonic GH4 in 2014, I considered 3 cameras, each with its own special 'party trick':  The first generation Sony A7s with it's legendary low light sensor; the Olympus OM-D E-M1 with 5-Axis Image Stabilization, and the Panasonic GH4 with internal 4k recording.  The Sony A7s Mark II combines all these 'party tricks' into one camera.
  • 5-Axis Image Stabilization
  • Low Light Sensor
  • Internal 4k Recording
For a fast and light, run and gun, adventure/travel type photographer/filmmaker, these features are killer.

5-Axis Image Stabilization
I would put this feature at the top of the list.  It's the only feature I miss, moving from my Olympus OMD EM5 to the Panasonic GH4.  While it's useful for still photographers, it's simply incredible for videographers.  It's almost like having a gimbal/steadicam built into the camera.  Technologically, it's quite a feat that Sony has been able to stabilize a sensor 4 times the size of the M4/3 sensor like the OMD EM1.


With a little stabilization with software in post-production, this would look very solid

Low Light Sensor
Low light shooting on the A7s is a different league and opens up new shooting possibilities (I'm thinking pre-dawn alpine starts).  The A7s sensor also has more dynamic range than the GH4, and the new A7sII should be the same or even better.  Higher dynamic range will allow more flexibility in post processing, both for still images in for video.  The A7sII has a full frame sensor, which will give me more options with depth of field.

Check out the low light capability of the A7sii in this video from Sony

Internal 4k Recording
While the original A7s had the ability to shoot in 4k, it could not record this internally.  The new A7sII adds internal recording capability, which keeps the 4k setup compact, lightweight and simple.  This was the one killer feature the GH4 had over the original A7s.

Other A7sII Benefits over the GH4
USB Charging
One advantage the A7sII has over my GH4 is that the batteries can be recharged in camera by USB from an external battery, saving the need to carry a charger and cable.  It also makes it easier to possible to recharge in the field using a simple external battery like the Anker that I usually carry to recharge my iPhone and Gopro.  The A7sII battery doesn't last as long as the GH4, but they are also about half the size and weight, so I think that's a wash.

'Always On' Depth of Field Preview
One of the least used buttons on cameras is the Depth-Of-Field Preview button.  Cameras normally keep the lens apertures stopped wide open to allow the maximum amount of light in for a bright viewfinder and make it easier to manual focus.  When you press the Depth of Field Preview button, the lens is stopped down to the selected aperture, the image gets darker, and shows you what is acceptably sharp or blurred.  The A7s II can be selected to have the Depth of Field Preview 'always on', which means as you change the aperture, you can view the resulting depth of field changes 'live' on the LCD or EVF.  

Ability to Transfer RAW Images Wirelessly to iPhone
I shoot RAW still images.  It's nice to be able to grab a RAW shot off your camera, then send it wirelessly to your smartphone where you can do some basic editing, then upload it to social media.  The A7sII can do this with RAW files by converting them on the fly to JPEG images, which it then sends to your IOS or Android device.  If I wanted to do this on my GH4, I would need to shoot 2 copies on the camera, use the JPEG files to transfer to my iPhone, then come back home and delete all the JPEG files that I didn't need in the first place. 

Useable Continuous Autofocus in Video Mode?
Technically, the GH4 can rack focus by touching the screen.  Practically, I have not been very successful with this and tend to use manual focus.  Continuous AF in the A7sII video mode looks very useable in the following video clip.


No details on how the AF works for video, but this looks very useable

Downsides
A7s II, which has a Full Frame sensor, comes with some downsides when compared to a Micro Four Thirds camera like the GH4.
  • Weight
  • Cost
Weight
The A7s body and lenses, while lighter than comparable full frame equivalents from Nikon and Canon, are significantly heavier than the Panasonic GH4 kit that I'm presently using. The A7sII body weighs 584g. 480g for the GH4.  To replace the Panasonic 7-14mm f/4 Lens(300g) I'm currently using, I'll need the Sony 16-35mm F/4 Lens (518g).  Some increase in weight is to be expected, stepping up from M4/3 to Full Frame.  Sitting here at my desk, it's hard to imagine what an increase in load will feel like on my shoulders and back 3 days into a multi-day adventure, but I can tell you I won't like it.  As a side note, the A7sII battery doesn't last as long as the GH4, but they are also about half the size and weight, so I think that's a wash, weight wise.

Cost  
You get what you pay for.  If you are coming from a Full Frame camera, the A7s II may be reasonable, or even cheap.  Coming from a Micro Four Thirds camera, I find the camera and lenses expensive.  Again, you get what you pay for, as it's a step up from M4/3 to Full Frame, just something you should factor into your considerations.


Final Thoughts
The Panasonic GH4 is the best handling camera I've ever used.  It is a great balance between image quality for its size and weight.  I've used it in wet/humid, dry/dusty conditions, and it has not failed me yet.  But it's not particularly great in low light, nor does it have 5-Axis Image Stabilisation.  Ultimately, my decision to switch will rest on what Panasonic comes out with the GH5.

Thursday, June 4, 2015

3 Basic Nutritional Supplements for Expeditions and Adventure Travel

The first rule of supplementation is - Real food first.  This means you should try to get your nutrition from fresh, natural, whole food.  Supplementation comes in to fill in potential nutrition gaps, which could happen if you are travelling and not quite sure of what food is available, or on expedition where fresh, whole food may not be available.

Yumm!  Liver Tablets, Probiotics and Fish Oil
I'll tell you what works for me, but I'm not a doctor, or nutrition expert, so please do your own research or seek medical advice before consuming any supplements.  Here are 3 basic, but key, nutritional supplements I take, whether at home or traveling to some adventure:

1.  Fish Oil
Fish Oil is a common term which refers to Omega-3 Fatty Acids, specifically EPA and DHA.

The body uses fish oil in many ways, including: Development and protection of the brain; cardiovascular protection (also 'thins' the blood by making it more 'slippery'); balances out Omega 3 and 6 ratios (our modern diet contains an unbalanced ratio of too much Omega 6); has anti-inflammatory properties; and helps protect against skin issues (psoriasis) and allergies.

The human body cannot make EPA or DHA, so you have to get it from your diet.  The best sources are cold water oily fish, like sardines, salmon and anchovies.  A rising problem with consuming these fish is that they may accumulate toxins like mercury dioxins and PCB.  If you are far from the sea, grass fed cattle is another source.

Fish oil in supplement form is usually molecularly distilled for purity, then recombined to ensure a consistently potent product.  To ensure I get my quota of Omega-3s when I travel, I take a single capsule of Now Foods Ultra Omega-3 daily, which provides me with 500mg of EPA and 250mg of DHA.

2. Probiotics
The human body is full of bacteria, both good and bad.  Probiotics are the 'good' or 'helpful' kind.

Researchers are still figuring out the many uses of probiotics.  They not only help the digestive system, but it is thought they also enhance immunity by shutting out bad bacteria. They also easy symptoms of Irritable Bowel Syndrome, Crohn's Disease, Eczema and other allergies.

Sources of probiotics include kefir, yogurt, miso, sauerkraut, kimchi and pickles.  Beneficial probiotics also exist in the soil which, with modern cleanliness, we no longer consume.

Because they are living foods, I supplement with 'shelf stable' probiotics that require no refrigeration and travel well.  I use Garden of Life Primal Defense which is a strong, broad spectrum probiotic supplement, which contains both colonizing and transient soil based probiotics which may be beneficial, but through modern cleanliness, we may no longer consume.

3. Desiccated Liver Tablets
Sometimes called "Nature's Multi-vitamin", the Desicatted Liver Tablets I take are made from pure, grass-fed beef liver that has been de-fatted, and then freeze dried.

Liver is a rich source of heme iron, which is a great blood builder.  Exactly what is needed on a trip to high altitude.  It is also a rich source of amino acids, minerals, B-vitamins and Cytochrome P-450.  It may also extend endurance as demonstrated in the following experiment:


Proc Soc Exp Biol Med. 1951 Jul;77(3):488-91
'Dr. B. H. Ershoff took three groups of rats and fed them controlled diets for a twelve week period. Group one ate a basic diet fortified with vitamins and minerals. Group two ate as much as they wanted of the same diet plus B vitamins and brewer's yeast. Group three ate the basic diet but had 10% desiccated liver added to their rations.
Then the doctor placed the rats one by one into a drum of water, out of which they could not climb, it was either swim or drown. The group one rats swam an average of 13.2 minutes. Group two, an average of 13.4 minutes. Group three, however, were still swimming at the end of two hours.'

I take 2 Universal Nutrition Uni-Liver Tablets each morning.  High on Mt. Everest when my stomach could not function well, it was one of two supplements that I would swallow with my instant noodles (the other was fish oil).  I'm not sure if that was enough to get the endurance boost, but it was worth a few grams of protein and enough for the summit.
I order these supplements from iherb.com.  For international orders, they are hard to beat for selection, price and shipping.  Get $10 off your first order with my discount code KOH756.

Sources: Web MD, Michael Colgan, Robb Wolf, Chris Kresser, Dave Drapper

Monday, March 16, 2015

Specialized Epic vs. Epic WC

This is a discussion on the Specialized S-Works Epic vs. the S-Works Epic World Cup, and maybe help you to decide which one is right for you.  I'll be comparing older models and not the current 2015 bikes, but you might find the information still relevant.

My 2012 S-Works Epic is the best bike I have ever ridden (it's the bike that won Olympic gold in 2012), but it was heavily used, and I needed to replace the bike in 2015.  In 2014, Specialized split the Epic model into two sub-categories to fit different rider needs:  The normal Epic for marathon riding, and the WC (World Cup) for fast XCO type courses.  The WC is stiffer, has slightly less suspension travel (95mm vs. 100mm) and is strictly a 1x drivetrain as it does not have a mount to attach a front derailleur.I got a deal on a 2014 Epic WC and went with that.  The 2015 Epic WC hasn't changed much from the 2014 model that I ride, but the 2015 regular Epic has some pretty significant changes from the 2012 model that I rode, including a new upside down fork, 2x11 drivetrain and the addition of a dropper seatpost.
The late Burry Stander signing my 2012 Epic frame
The frame for the 2014/15 Epics saw a significant change from the 2012/13 models to intergrate what Specialized called SWAT (Storage water air tools) into the frame.  I really like this, especially the ability to hold 2 full sized water bottles, even on a size Small frame.  But in order to do this, they had to make some geometry changes.  My Specialized bike fit, (courtesy of Specialized Asia Pacific), saw me on a size Small 2014 frame, with a longer stem and offset seatpost, compared to my 2012 Medium frame Epic with a shorter stem and a non-offset seatpost.  The weight of my Size M 2012 Epic, with some tweaking was 10.0kg (without pedals).  My size S 2014 Epic WC weighs 9.6kg (without SWAT kit, without pedals).  Note:  My WC is modified with the 2013 S-Works crankset to enable me to fit a 30T  (or 28T) chainring. 

Specialized Asia Pacific's VJ Varada dialing in the fit on my 2014 Epic WC
I crashed my Epic WC the first time I rode it, as a result of an improper suspension setup and an over enthusiastic rider ;)  The 5mm difference in suspension travel between the WC and regular Epic doesn't sound like a lot, but you can really feel the difference in drops and rock gardens.  It is a much firmer feel, and combined with the quicker steering geometry of the WC, I find myself slower than my old Epic going down drops.  The WC shines if I'm blasting through twisty singletrack.  Compared to the regular Epic, I can feel better acceleration and power transfer from its shorter, thicker chainstays.  Its a flickable bike that favors an aggressive riding style.  The WC is built like a fighter jet.  It wants to turn.  Pressure on the handlebars or lean, and it will turn.  This is a bike that needs constant attention, and on days when I'm not riding well or had too much to drink the night before, I'll find it twitchy.   It's not really the bike for long days when you want to put the bike into auto-pilot and cruise.  
Specialized S-Works Epic World Cup 2014
I like to think of my regular Epic as a bomber jet.  It is stable, forgiving, confidence inspiring.  It is a bike that wants to go straight when something deflects it off course.  At the top of something gnarly, and I find my vision closing in on my front tire, I can trust my regular Epic to get get me out of trouble.  Yes, it is slower turning, and slower to accelerate, and if I'm racing on an XCO type course where I'm only riding for about an hour and a half, and every second matters, I would prefer to take my WC over the regular Epic.  
Specialized S-Works Epic 2012
The bottom line is that for most of my riding, I prefer the regular Epic.  The Specialized Epic for 2015 sees some very exciting changes, and look awesome.  Hopefully, I'll get to ride one over the next couple of weeks, and I'll update this post if I have anything to add.

Update Mar 19:  I got a chance to ride a 2015 S-Works Epic today.  Everything I said about my 2012 remains true with the 2015 version, except the 2015 is even more stable, and stiffer.  I don't know what it weighs, but it is surprisingly light, considering it has a dropper post, 2x11drivetrain and RS-1 fork.  

Tuesday, July 9, 2013

3 Best Lenses to Take for Expedition and Adventure

If you have a M4/3 camera like the Olympus OMD EM5, or Panasonic G6, and are wondering what lenses to buy for expeditions, adventure or travel, you might find this post useful.  In general, I'll carry the following three lenses for expeditions and adventure.  They are light, versatile, and high quality. 

Wide Angle Lens
What I Use - Panasonic 7-14mm f/4.0
The lens that's mostly on my camera is the Panasonic 7-14mm f/4.  It's an ultra-wide zoom lens and I probably shoot 70-80% of my photos and video with it.  Wide angles are a staple for adventure photography because they allow you to get very close to the action and still capture background.  They also have great depth of field, which can be useful in outdoor situations where you may want to capture as much foreground and background detail as possible.

Option 1 - Olympus 9-18mm f/4.0-5.6
Sometimes I wish I'd gotten this lens instead.  It's lighter, more compact and cheaper.  It doesn't go out as wide, but has a bit more reach on the long end.  Personally, I prefer this focal length range of this lens over the Panasonic, but from what I've read, the Panasonic is a little sharper with a little faster aperture.  I don't think you can go wrong with the Olympus 9-18mm if you should choose this.

Option 2 - Rokinon 7.5mm f/3.5 Fisheye
If your main lens is the 12-50mm or a superzoom, then you may feel that either of the above wide-angle options have too much overlap.  A fisheye is a great option, but one that you have to be careful not to overuse.  The Rokinon (aka Samyang, aka Bower) fisheye is a cheap option (about half the price compared to the Panasonic version) that you can throw in your bag and pull out for special shots.  It's very sharp, but the downside of this lens is that the aperture needs to be set mechanically on the lens (old style) and you need to focus the lens manually (which is no big deal on a fisheye because the depth of focus is so big you can just set the focus at 1.5 or 2m and forget it).

Superzoom Lens
What I Use - Olympus 14-150mm f/4.0-5.6
The 14-150mm f/4-5.6 lens from Olympus is probably the sharpest superzoom I've used.  It's probably the lens I like least, but one that is quite frequently on my camera.  I would say 10-15% of my shots are made with it.  Superzooms are very useful in expedition or adventure situations when your mobility is limited (like if you're on a fixed rope or belay when climbing, or on a kayak, or when you are just plain too tired to make a lens change!) or when you need big changes in focal length in rapidly changing situation (eg. you are at a crowded market place, capturing the scene with the wide end of the superzoom and, in a fleeting moment, need to zoom in to capture a face in the crowd).   If you are climbing El Cap, a possible two lens combination could be to use this lens in combination with a fisheye.

Option 1 - Panasonic 14-140mm f/3.5-5.6
Panasonic's 14-140mm f/3.5-5.6 lens is new on the market.  For Panasonic camera owners, its a no-brainer:  Buy this version for the image stabilization which is built into the lens.  Olympus owners can use either superzoom because image stabilization is built into the body of the camera.  Take note that Olympus lenses zoom the opposite direction from Panasonic.  For me, the zooms on Panasonic lenses are more natural, and if this lens had been out when I bought my superzoom, this would have been my pick.  It's even lighter than the Olympus version, and has faster apertures across the range.  It's in short supply at the time of writing, and few reviews as to how it performs.

Option 2 - Olympus 12-50mm f/3.5-6.3
This is one lens I haven't used, but by it's reputation, it should be even sharper than the two superzooms above.  Technically, it's not a superzoom.  The focal length range starts from a very useful 24mm (in full-frame equivalent) wide angle.  That's wider than the above superzooms, which only start out at 28mm.  But the long end stops at 50mm (100mm in full-frame equivalent), which would appear to be useful for portraits, but the maximum aperture at this focal length is only f/6.3, which would give the same amount of background blur on a full-frame 100mm lens at f/12.6.

Prime Lens for Sharpness, Portraits and Low Light
What I Use - Panasonic 20mm f/1.7
The 20mm f/1.7 is great because being a pancake lens, it is very small and light.  Primes are very sharp and have fast apertures.  I use primes whenever I can in preference to zooms.  Because they are so sharp, they are great for capturing detail.  Their fast apertures also help to blur away the background, making them good for isolating subjects.   The 20mm f/1.7 is my default night lens, as the big aperture and focal length are useful in low light conditions.  On Panasonic cameras, there is a special teleconverter ETC Mode which extends the usefulness of this lens for video.  Essentially, ETC Mode multiplies the focal length by 2.7 times with no image degradation in video mode.  This means that if you are shooting video with this lens on a Panasonic body like the GH3, you can have a 'wide-ish to normal' 20mm lens that converts to a 54mm f/1.7 'portrait-ish' lens!  In a pinch, I'll use the digital teleconverter on my OMD EM5 to get a similar effect, although it doesn't work as well on Olympus bodies as there is some image degradation.  Take note that although the autofocus speed of this lens was ok on my GH2 body, it crawls on my OMD EM5.  There is a new version of this lens that is being released soon that should bring about autofocus speed improvements.

Option 1Olympus 45mm f/1.8
I really like this lens and use it every chance I can.  It's lightning fast to focus on my OMD EM5, super sharp and has a nice out of focus, blur highlights (bokeh), making it a great portrait lens.  When I can only carry two lenses due to weight considerations, I'll carry the 45mm lens together with my 7-14mm, and skip the 14-150mm.  As a three lens kit, I'll occasionally carry the 45mm instead of the 20mm in my travel kit, if I'm expecting to shoot some portrait stuff.  In general though, the 20mm is a more versatile focal length and makes it into my bag most of the time.

Other Prime Lens Options
In reality, there are a huge assortment of prime lens options that will do the job, including all sorts of legacy lenses that you can fit on M4/3 bodies using an adapter.  You'll need to manually focus and set aperture on the lens, but any of these could work depending on your budget, style and interests.

Wednesday, May 29, 2013

10 OMD EM5 Tips I Wished I'd Known Earlier

My Olympus OM-D E-M5, with John Milich grip, simple strap, and oversized shutter button.
The Olympus OMD EM5 is one of the best loved micro four thirds cameras to date.  It's retro form, compact and weatherproof body, and a wide selection of high quality lenses have contributed to its popularity.  The camera is certain capable of exquisite image quality, but to tell you the truth, handling and using the camera have been a bit of a mixed bag for me.  I've learned some things along the way, and have come to terms with the camera.  Here are 10 handling tips I wished I'd known from the get go:
A wide selection of high quality lenses are available.  Olympus OMD EM5, 20mm, F/1.7, 1/3200, ISO 200.
Autofocus
This is my biggest performance issue with this camera.  Unlike DSLRs which use distance information, called Phase Detection, to assist AF, the autofocus of the OMD EM5 works only by comparing contrast of adjacent pixels, called, er... Contrast Detection.

As a default setting, I leave my DSLRs in a mode whereby the camera, using all of the autofocus points which cover the screen would seek out the closest subject, and focus on it.  This won't work on the EM5, because without using distance information, it won't know what is closest.  The camera focuses fastest and most accurately if I select a specific AF Point for it, and it's usually the center one.
If it ain't moving, the AF is spot on.  I focused the center AF point on the eyes, recomposed and shot this Monitor lizard in my backyard. Olympus OMD EM5, 100-300mm at 162mm, 1/320, F/4.6, ISO 320.
#1. I use a Specific or Center AF Point, not Multi-Area Autofocus.

Continuous Autofocus, by inference, doesn't work well either.  What happens with the EM5 is that the focus pulls in and out, until it gets something sharp on the selected AF point, then pulls in and out until it is sharp again, and so on.  A camera using Phase Detect AF can more accurately predict and track the subject, leading to more shots in focus. 
Single Shot Focus is fast, accurate, and at 9 frames per second, allows you capture the decisive moment.  Olympus OMD EM5, 100-300mm at 100mm, F/4.0, 1/200, ISO 1000.
#2.  I don't use Continuous Autofocus with the EM5, only Single Shot Focus.
One of the best tips I got was from a guy by the name of Bryce Bradford, who seems to be an Olympus Sponsored shooter.  He's set up his camera as follows:

Fn1 - Magnify
Fn2 - MF
Rec. - AEL/AFL
AEL/AFL Modes: S2/C2/M3

This allows him to separate the autofocus from his shutter button.  In other words, I can prefocus by pressing the shutter button as usual, then turn off the autofocus by pressing Fn2, wait for my subject to enter the field of focus, then fire away at 9 frames per second.  It's kind of an old school sports shooting technique, but it can work.
A little tougher to get the shot if it's moving.  I pre-focus on a spot before the action, then fired away when Sandy Maxwell entered my focus zone. Olympus OMD EM5, 7-14mm at 7mm, 1/200, F/4.0, ISO 200.
#3. Find a way to separate the Autofocus function from the Shutter Release.

The same applies to autofocus in video mode.  If you leave autofocus on, the camera will drift in and out of focus.  I prefer to leave mine in manual focus and set the Fn2 button to autofocus.  That way, I'll press Fn2 to focus, then press the shutter button to start shooting.  If I need to refocus, I either do it manually, or press the Fn2 button again.

#4. Separate the Autofocus function from the Shutter button in Video Mode.
I used single shot AF at 9FPS to capture slower moving subjects.  OMD EM5, 7-14mm at 7mm, 1/2000, F/4.0, ISO 200.
Video
Ok, so I'm a newbie at video, and I thought by reading the specs that the camera shoots at 60 FPS (frames per second) at 720p (a reduced resolution).  It doesn't.  It only shoots at 30FPS, even at 720p.  Shooting 60FPS is useful for the times you want to do a slow motion effect in the edit.  At 720p, the video just doesn't look good, probably because of the low bit rate.   I struggled with video until I finally figured this out (doh!) and have come to terms with this limitation.

#5.  Shoot video only at the highest resolution, ie.1080i, but note that it only shoots 30FPS.

Ergonomics
The power switch is badly located.  It normally takes two hands to turn it on.   Climbing and biking are my main sports and I sometimes need to turn on the camera, shoot, and return the camera to its case with one hand.  There is a way to turn it on with one hand, and you need to hold the camera against the tension of the strap, and flick the power switch on and off with your thumb.  With an add-on grip, this is much easier to do.

#6. Learn how to turn on the EM5 with one hand.

Another neat trick: At 9 FPS, you can do a 'hand-held' HDR.  Olympus OMD EM5, 7-14mm, F/4.0, ISO 200, HDR with Photomatix Pro.
The rubber eyecup comes off too easily, and the replacements are not easy to come by.  I'm on my second one.  Either use a little epoxy (which will probably void your warranty) to keep it in place or keep a very close watch on that eyecup.

#7. Watch that rubber eyecup.

A grip improves the handling of the EM5.  There are at least four different grips for the EM5 on the market.  The original Olympus HLD-6 Grip, which comes in 2 parts, and is the most expensive, but probably the best in terms of feel, but blocks the battery compartment; the J.B. Grip, which is the cheapest, lightest and offers decent grip; and the grips from John Milich and Really Right Stuff.  At the time I got mine, the RRS grip was not yet available and I bought the grip from John Milich and am really happy with it.  Both of these grips have built-in quick release plates, which is a must for me.  The only time the grip comes off is if I'm not carrying a tripod with a quick release, and if I need to go really light.
John Milich Grips for the OMD Em5.  The Basic Grip is the lightest and is the one I use.  It's the one on the top.
#8. Get a grip.

Built-In Timelapse Function
The EM5 will do timelapse without any other equipment.  Well, nearly.  With a couple of rubber bands to hold down the shutter button while the 'anti-shock' function is engaged, you have timelapse function with a limited set of time intervals.  The Anti-Shock function is really a delayed shutter release function and is hidden away in the menu under Custom Function E.  I can use regular rubber bands to hold down the shutter button, which allows the camera to fire one delayed shot after another.  I can use regular rubber bands which grip my oversized shutter release button, but you can make a fat rubber band out of on old bicycle inner tube if regular rubber bands won't work.  I store my rubber band by wrapping it around my 7-14mm lens, which is what I use to shoot most of my time-lapses with.

#9. Stick a couple of Rubber Bands in your camera bag for a lightweight Timelapse Solution.


The start and ending timelapse sequences in the above video were shot using the rubber band technique.

Image Stabilization
The 5-axis image stabilization in the OMD EM5 is alien technology.  It's game changing and there's nothing else like it on the market.  But if you think it works great for still, for video, its amazeballs!  I can attach the camera to my GorillaPod Focus, splay out the two lower legs, curl the top leg over the top of the camera to make a handle and, voila!... A steadycam!  Well, not quite, but quite good, and for no extra weight or complexity of setting up a steadycam.  For a go 'fast and light' videographer, this is a big plus.  If I'm out without the Gorillapod, I can squat down, lock my elbows on my knees, and get away with 'tripod-ish' looking clips.  It's that good.

#10.  Image Stabilization Rocks!  It's the main reason I'm still with this camera!
New Year's Eve, Phuket, Thailand. OMD EM5, 20mm, F/1.7, 1/400, ISO 3200
In Closing...
I think if you're happy with the AF, which excels for still subjects, this is an awesome stills camera for photographers.  For video, it's mixed bag.  On the one hand, it's got that amazing stabilization, and on the other hand, it's let down by no choice of frame rates.

For me, a great camera is one which 'disappears' when I'm taking photos, and handling is instinctive.  With the OMD EM5, I have to think a lot about setting up the camera for the shot.  For now though, the ability to go 'fast and light' is invaluable, and I've come to terms with the OMD EM5 because at the end of the day, I still come back with great clips and shots.